 Of course, without a barn on the plot is quite difficult. The same garden tool folded. Seeds. Harvested. Bicycle. Wheelbarrow Yes, a lot of things.
In order not to drag the whole house, there is a shed. Of course, you can hire builders, and they will do everything for you. But it is quite possible to make a barn with your own hands, if you know how the nail differs from the screw.
It will be much cheaper. True, you have to spend a little time and work with your hands and head.
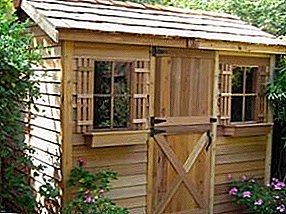
Shed to give
Of course, a barn made of wood is cheaper. Yes, and it is much easier to do than stone. If you use quality wood, and process it properly, this shed will last 100 years.
Making a good bird feeder with your own hands.
Learn the benefits of blueberries on our site //rusfermer.net/sad/yagodnyj-sad/posadka-yagod/vyrashivanie-sostav-i-poleznye-svojstva-cherniki.html.
How to dry rose hips in the oven read here.
 Making a good bird feeder with your own hands.
Determine the place
Start building a barn should be with the choice of location. It is advisable to build it closer to home. First of all, so that when performing all sorts of work in the barn, you could see the entrance to the house. And preferably the entrance to the site. Again, imagine that you need to run for a fireplace for firewood in a shed, and it pours rain on the street.
The foundation for the barn
To mark the foundation on the ground, you need a tape measure (the longer the better), a few sharpened pegs, a rope, and what pegs can be hammered. Ax or hammer. Everything is simple, just need to ensure that the corners were straight. To do this, measure the diagonal.
 Under the foundation columns, you need to dig as many holes as you plan. The distance between the pits is approximately 1.5 meters. This is if a bar of 100x100 mm will be used for the walls of the shed.
If the bar is larger, for example, 150, and the floorboard is five, then the distance may be more. The depth of the hole is 600-7 mm.
Pour a layer of sand-gravel mix of 10 centimeters into the ready hole, and lay bricks out of bricks.
Corner and central posts not bad to reinforce steel pins. After the posts are ready, they need to be plastered. Before you fill up the columns, you need to treat them with special mastic for waterproofing.
Read on our site the beneficial properties of mint and grow it in the country.
Learn how to catch a swarm of bees //rusfermer.net/bee/info/newbie/kak-pojmat-pchelinyj-roj-vybor-vremeni-mesta-i-sredstv.html.
 Read on our site the beneficial properties of mint and grow it in the country.
Bottom frame of the barn
In order to work with the bar, you will need a wooden frame. Churn them - in any case, they will come in handy to cut wood.
First of all, we manufacture the foundation for the whole frame of the shed from a timber. Bars are joined to the floor of the log. To do this, neat cuts are made strictly in size, and the excess is knocked out with an ax.
A timber that is used for lags must be treated with special fire and bio protection. The timber, of course, is laid not directly on the foundation brick, but on waterproofing. Which consists of two pieces of roofing material.
A steel pin having a diameter of 10 mm is installed in the bar. The hole of the same diameter should be made in the bar that will be installed vertically.
Stand on the base of the timber should be flush. The front vertical bars have a height of 3 meters. Rear bars - 2.3 meters in order for us to get a ramp. The angle of the slope is 30 degrees.
Upper frame of the barn
Without scaffolding it can not be done. Therefore, in advance it is necessary to put together a goat-forest.
Vertical bars are set on the level and fixed with props. After this, the upper part of the frame is mounted from the scaffolding. Fasten the timber to the front and back of the barn.
Rafters and floor
 We start from the floor. On the floor laid on the boards - logs floor boards. Pre-treat them with protection. And fasten. Nail or screw. When laying is finished, the floor is treated with a plane.
For rafters use the same board as for the floor. First, measure the length, not forgetting that it should be larger than the size of the barn, since there must be a departure rafter. Front - 300 mm, and behind - 200 mm. Cutting is done in places of support. Rafters set and secure. Step rafter - 50 cm.
With all the frame. Now on rafters should fill crates. The distance between the boards depends on what you will cover the barn.
Note to flower lovers: Hosta, planting and care.
Bruner flowers perfectly decorate your garden //rusfermer.net/sad/tsvetochnyj-sad/vyrashhivanie-tsvetov/brunera-krupnolistnaya-i-sibirskaya-posadka-i-uhod.html.
 Note to flower lovers: Hosta, planting and care.
Barn lining
So we got to the wall paneling. The usual board of 25 mm undertakes and is stuffed on walls in the American way. That is, the boards are packed from the bottom up with an overlap. The overlap is small-3 cm. In the end - no gaps.
Packing boards made in a circle, starting from the front. Boards set by level.
Shed roof
Well, mount slate on the roof or ondulin case is simple enough. Just remember that it is also desired from the bottom from the corner, and overlap, both vertically and horizontally. Placed slate rows. First, the first row from corner to corner, then the next.