A familiar picture in August: in an apartment in dark and not very places there are a handful of tomatoes on the newspapers. Shot from the bush in the stage of technical maturity. For ripening.
Especially often it happens in the northern regions. And what is this tomato ripe, if you eat it right from the bush?
Alas, in conditions of too short a summer, it is not always possible to try. In such regions only greenhouse way of growing tomato.
Benefits
Tomatoes are heat-loving plants that do not always grow well and bear fruit in the open field. And although today a lot of hybrids that are resistant to adverse weather conditions have been bred, it is better they still grow ripe in a greenhouse.
- tomatoes grow at optimum temperature and humidity;
- yield increases at least 2 times;
- ripening occurs 2-3 weeks earlier than in the open field;
- reduced risk of disease.
All conditions are feasible when compliance with the cultivation of tomatoes in a protected ground that has some differences from caring for plants on the street.
The size
 Most often grown in greenhouses indeterminate tomato species. These are plants with a stem up to 2.5-3 m. It needs support and a garter.
Therefore, the structure must be high. Its area is calculated depending on the needs.
Most often bushes planted according to the scheme 50 x 50 cm. Thus, it is easy to calculate the size.
During the construction of the greenhouse, it is necessary to take into account that other vegetables can be planted on this heated area, as well as lovingly warm and well neighboring with tomatoes. Therefore, the area can be calculated with a margin. Standard greenhouse provides three ridges.
Preparation for construction
As with any construction, the construction of a greenhouse on the plot requires a thoughtful approach and preparation.
A place
The first thing to do is to determine the place where it will stand. If the terrain of the site is difficult, it is better to choose place on a hill. Carr places will not work, as the plants will die from excess moisture. The place must be flat so that the greenhouse is stable and does not collapse from the wind. Nearby there should not be trees and buildings that give shade, otherwise its inhabitants will lack light.
If you plan a heated greenhouse for year-round use, build it better next to the houseso as not to carry out communications - water and electricity - to the other end of the site.
Useful video about homemade greenhouse for tomatoes do it yourself:
//youtu.be/h92Troh9V1c
Type of
Before making drawings, decide what you will grow in the greenhouse. Its size depends on it. In addition, it is important whether she capital or folding. Under the capital needed foundation, folding polycarbonate mounted directly above the beds.
Foundation
 The foundation under the capital greenhouse performs several functions:
- gives stability to the construction;
- separates the walls from the outer layer of the earth for greater thermal insulation;
- Blocks the path of garden rodents.
The foundations are different, depending on the type of greenhouse:
- block foundation for polycarbonate greenhouses. It protects against excessive moisture in the soil, so it is well suited for areas located in low-lying areas;
- concrete brick the foundation is good for greenhouses, which will be used in the spring-summer period, because it does not protect the beds very well when the soil freezes;
- strip foundation from a bar it is laid for temporary greenhouses for 2-3 years due to the fact that the tree begins to rot and collapse;
- concrete foundation monolith poured under the capital greenhouses for the winter growing of vegetables. This foundation perfectly protects from cold weather, pests and excessive moisture. But it is expensive and is recommended for areas with moving soil.
Materials
Having made the drawing and having decided on the sizes, you can proceed to the choice of materials.
Frame
For a polycarbonate greenhouse frame metal profile is used. Its advantages are low price and lightness, the disadvantage is that thin metal is not resistant to deformation.
If wooden racks are used, it must be included in the list of materials. impregnation antiseptics and paint for them. The advantages of wood - environmental friendliness, the disadvantage - susceptibility to rotting.
Coating
 Coverage is selected in accordance with the operation mode of the greenhouse. For the summer is fine film, especially since manufacturers offer a wide selection of reinforced, reinforced and other films.
Glass coating installed on capital greenhouses, built on level ground with a good foundation.
If the primer under it "plays", the glass may crack. This can be attributed to the disadvantages of glass coating. To advantages - excellent light conductivity - up to 92%.
Build a greenhouse with your own hands for a tomato with a photo
Before construction, you must prepare the site.
- pegs are driven in on the leveled ground surface in accordance with the size of the future greenhouse;
- dig out foundation trenches a depth of at least 40 cm (perimeter or tape under the entire greenhouse);
- trench covered with sand on 20 cm and carefully stamped;
- formwork is being built (its edge should be 20 cm above the ground) and a mixture of cement with sand and rubble is poured;
- after the mixture is completely set, a brickwork in 1-2 rows is made on it and waterproofing is applied. It is attached to the masonry with anchor bolts;
- frame slats treated with antiseptic and sawn in accordance with the drawing;
- vertical posts are fixed on the foundation. The distance between the support posts should correspond to the width of the polycarbonate sheets;
- on top of the racks are mounted bars on the perimeter - this is a harness that imparts rigidity to the structure;
- in the lower and upper corners the structure is strengthened sawn off at an angle of 45 ° to the main racks and strapping;
- on the frame is mounted coating.

rafters are installed and the ridge beam is attached;
Such a greenhouse will last for a long time, if several times a year the wooden parts are impregnated with protective mixtures and covered with paint.
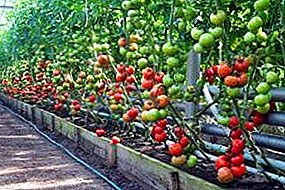
Visually see how your greenhouse for tomatoes may look like in the photo below:


Having spent on the construction of a capital greenhouse moderate money and dumb labor, you can get good yields from it for many years.