In our temperate climate, a greenhouse is indispensable for efficient farming in a small household plot.
This expands the boundaries of the vegetation period of plants and allows you to get a harvest on 2-4 months earlierand sometimes all year round. And the underground (more precisely, dug into the ground) greenhouse is one of the most effective designs.
Features
Underground greenhouses remain unpopular in modern Russia, but not because they are worse than others. On the contrary, these greenhouses have a number of undeniable advantages in front of greenhouses of other designs.
The advantages are as follows:
- Savings on materials: underground greenhouses dug into the ground, so most of their height falls on it. Only a low wall can separate the soil surface from the roof;
- Savings on heating: underground greenhouses are much warmer than usual, because they are not blown by the wind from all sides, and the main part of the "walls" is the earth itself;
- Reliability. Underground greenhouses on the flood, for example, from a gust of side wind.

TO disadvantages however, poor lighting and the need to take out large amounts of land.
They are digging in such a greenhouse for 2-2.5 meters, because it is at this depth that temperature drops are no longer observed.
What materials can be used for the frame and as a covering?
The materials for such a greenhouse can be used the same as for ordinary greenhouses: boards, beams, wooden poles, steel pipes, and so on.
The best material is metalbecause it does not collapse as fast as a tree. The disadvantage of metal is that if you choose as a covering material film, it can not just be nailed. We'll have to screw the boards to the metal, and we will already nail the film to them.
Covering material can be a film that will have to be blocked every year (at best, once every 2-3 years), because it is quickly destroyed by the sun's rays. Polycarbonate is more durable, and the most durable material is glass.
Walls can be built of any kind. bricks, cinder block, wooden boards or logsor it can be made monolithic from concrete. Here the best material is the one that is currently at hand.
Preparatory work
 The first thing to do before building a greenhouse is to inspect and prepare a place for it. It is desirable that this was a rectangular area stretched from north to south.
The length and width of the greenhouse may be different, it depends on the size of the site. There may be a greenhouse in a small garden 5Х20 meters.
Next, draw drawing based on their capabilities and plans.
Best if you make a greenhouse gable, with small, up to half a meter, walls of brick.
In the greenhouse should be provided the doors in each of the ends, and windows for airing. And since the walls are the ground, the windows should be in the roof.
Should prepare and materials.
It is necessary to think about the foundationon which the roof will rest. The foundation can be tape and consisting of concrete. For this breaks trenchinto which concrete is poured, which then hardens. Formwork is optional.
Trench can be dug like around trench (at a distance of at least half a meter to avoid collapses) and inside of it (Then the roof will be supported by wooden poles or metal pipes inside the pit).
Waterproof the foundation with roofing felt or roofing material. The strip foundation must be dug in such a way that its lower part did not freeze in the winter.
Instead of a tape foundation, you can use more economical - column foundation. To do this, in the corners of the greenhouse and along its future walls dig in wooden poleson which the design will be based.
Build a winter thermos greenhouse with your own hands
So, in the general case, the greenhouse thermos is constructed as follows:
- The choice of location and outline of the approximate project.
- Selection and preparation of materials for the construction of the greenhouse.
- Final editing of the project taking into account the available materials / the ability to buy them.
- Clearing and marking of the territory. The territory is laid out in different ways: by digging up a shallow trench on the floor of a spade bayonet or placing columns in key places where they will then stand support columns.
- Digging of a ditch and trenches under the base. Pit better dig by excavator, a trench or pits under the supporting pillars - you can manually. Then the walls and the floor of the pit will need to be leveled with a shovel.
- Filling of a trench under the base with concrete. Concrete freeze. If you chose a column base, you should process the pillars for waterproofing with resin or simply burn it on a fire (char), arrange them in the holes prepared in advance, bury and compact them thoroughly. You need to ram not with your foot, but scrap or another similar subject. Bury the pole at least half a meter.
- Foundation waterproofing with roofing material (if it is tape).
- Wall extensions (if you decide you need them).
- As the "earthen" part of the walls, walls artificially built over the level of the soil are desirable. to warm. This is done using foil thermofilm.
- Then you can install and bake (for example, a stove), from which a long pipe will go along the greenhouse under a slight slope, then through the knee it connects to a vertical chimney that goes outside through the roof.
- Build the frame. Elements of the frame are installed in the spaces in the foundation or wall, specially left for this purpose, then poured solution. If you are limited to supporting posts, they are already elements of the frame, and other elements are attached to them with nails (if they are wooden), or bolts (if the framework is iron).
At the same time, doors with windows are made. In the roof you need to provide special window to output the chimney. It is a wooden square with a circular hole cut in the center to fit the pipe. It is needed so that the hot iron pipe does not touch the covering material.
- When the skeleton assembly is ready, it's time to start harboring the greenhouse. The film is nailed through long slats (shingles), which allow you not to break under the nail heads. Glass requires special slots, as on window frames. As for polycarbonate, it is bolted using large washers.
- Final stage - installation chimney. For this operation, as well as to cover the greenhouse with covering material, efforts will be needed. two or three people.

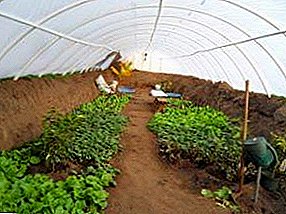
A photo
Visually see how to build an underground greenhouse with your own hands, you can in the photo below:


Floor
 If the thickness of the fertile layer allows, the floor can be not to do at all. It is enough to pave paths with boards in order not to walk in the mud.
If you got to the bottom of the sand, you need to put at least a half-meter fertile layer of chernozem with a slight addition of humus.
Also experienced gardeners recommend doing warm floor, laying a shallow cable, insulated and protected from the spade with a metal grid.
As one of the options - bed, dug on half meter, and paths along which a person can move - full lengthso that the bed is at chest level. Such a floor can be paved with boards, and the walls of the resulting trenches can be strengthened with formwork.
Conclusion
The greenhouse thermos dug into the ground is very efficient from the standpoint heat saving and of materials, easy to build and operate and resistant to wind. For its construction uses the same materials as for the construction of conventional greenhouses. Such greenhouses are gaining increasing popularity among Russian gardeners.