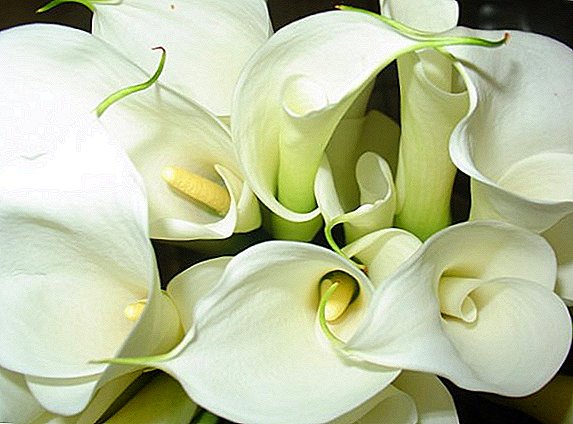
Calla has always attracted an unusual form of inflorescence, extravagant appearance and extraordinary fragrance. But flower growers love it for the fact that the flower can be easily grown both in the garden and in a pot at home. In any of these cases, calla is a relatively unpretentious plant.
Planting Calla in the spring garden
Planting callas in the open ground is carried out only in the spring. Autumn planting suggests wintering in the ground, and the plant's root system may not tolerate this.
Did you know? Calla belongs to the genus of perennial plants, united in the arum family. Its natural place of growth is the moist soils of South America and Africa. Her closest relative in the Northern Hemisphere is calla (marsh calla).
Site selection and optimum landing time
 Although calla is a relatively unpretentious plant, it is quite difficult to choose a place for it. It should be a shadow or a penumbra, but with a sufficiently large amount of light. Make sure that in the summertime at noon the flowers do not burn the direct rays of the sun, otherwise the leaves of the plant will wither and dry. It is desirable that the flower grew in the shade of trees or bushes. Also remember that callas do not tolerate drafts well.
They do not like stagnant water. Therefore, groundwater under the site should be far away, and the territory itself should not contribute to the stagnation of water. The soil under the plant should have good drainage and be slightly acidic. The ideal soil for a flower is in equal proportions mixed leaf humus, peat, sand and garden soil.
Did you know? Calla has another official name - zantedeskiya. It is also sometimes called rihardia or Ethiopian calla. The second name of the plant was given by German botanist Kurt Sprengel. He gave the flower the name of the Italian botanist Giovanni Zantedeschi, who was his friend. This name is not very rooted in flower circles, and the plant is often called calla.
Another important question: when to plant callas in open ground. Time is chosen when the last frost stops and the air and the ground warm up sufficiently. As a rule, this is the beginning of May.
Preparation of planting material
For planting it is necessary to choose strong and strong tubers of the plant. And the bigger they are, the more chances to see flowers in the first year of planting. Shriveled and sluggish tubers may not be viable. Immediately planted tubers in the ground is not recommended, they must be pre-treated. So, if you bought them back in February, the planting material should be wrapped in a napkin and kept at the bottom of the refrigerator.
 The rest of the preparation for planting calla bulbs consists in keeping the tubers in a weak solution of potassium permanganate and their subsequent reorganization. Damaged and rotted areas are carefully cut out, cuts are treated with green paint. After that, they are ready to be planted in open ground.
Some gardeners practice early planting of planting material in pots - in March-April. The bulbs are planted in specially prepared shallow pots: the containers are pre-disinfected and the soil is calcined in the oven. In the substrate the tubers are dipped 2-3 cm and watered once or twice a week. From April they can be taken out on the balcony or in the greenhouse for awakening. Transplanted plants in the open ground with an earthy ball.
Important! For the calla, porous pots are chosen to ensure adequate ventilation of the air. It is important that no other plants grow in the pot or near it - the calla is jealous of its neighbors. Periodically, the top layer of soil is carefully removed to avoid damaging the protruding roots, and sprinkle fresh.
Site preparation for planting
The site where the calla should grow, is cleaned and dug up with a substrate of sand and hardwood humus, taken in equal parts. Ensure that the soil has good drainage. Since calla loves slightly sour soil, it is worth adding a few needles to the soil around the planting site. It will attract earthworms, which contribute to the oxidation of the soil. Also prepare a complex mineral fertilizer, which must be applied at 30-40 grams per square meter of land.
Planting tubers on the site
 When planting garden callas in open ground, carefully remove them from the pot so as not to damage the tubers, as they are very fragile. They are immersed in pre-cooked holes at about 5-10 cm in depth. The distance between them depends on the size of the bulb, but not more than 40 cm. Planting material is not recommended to press into the ground, but only slightly sprinkled on top, otherwise the roots may rot.
Planted plants should be watered well and the next couple of weeks do not take care of watering. If after a couple of weeks the sprouts have not appeared, it is necessary to moisten the soil around the hole so that the water does not fall on the tubers themselves, which can rot.
Important! Lack of germination in the first weeks should not scare. The plant does not stretch up until it forms the root system, and this may take up to a month. Calla blooms too for a month.
How to care for garden calla
Agrotehnika calla is extremely simple. It needs to be watered and loosened regularly after that, while observing sufficient light and thermal conditions. If you applied fertilizer when planting, then in principle, more feedings it is not required. If you are attracted to the site of earthworms in advance, then loosening may not be necessary, although it is better to do this after each watering.
Did you know? Before the rain, dewdrops appear on the leaf and tips of the green leaves of the calla that wrap the inflorescence.
 If fertilizing is necessary, fertilizer should be selected for the bulbous flowers, which should be applied once every two to three weeks. When the plant blooms, add 15-20 g of potassium under each bush. It is important not to overdo it with nitrogen-containing fertilizers, as they contribute to an increase in the green mass of the plant.
A very important question - how to water callas? They love moisture, but do not tolerate when water stagnates. Therefore, one should not allow overdrying of the soil, but it is also not necessary to fill in the tubers.
Did you know? Beginning flower growers callas flower called a leaf that envelops the bud of the inflorescence and may be of different color. In fact, the flower of the plant, though fragrant, but nondescript.
To stimulate the growth of the bush, it is necessary to cut off all flower stalks after the flowering period. At the same time, young shoots should not be touched. If you properly care for calla, you will get up to a dozen peduncles.
The advantage of a flower is that rarely pests or diseases appear on it. Sometimes whiteflies can appear on it, but they do not cause significant harm to the plant.
Ways to breed calla
The reproduction of calla depends on the type of plant. Some have a branched powerful rhizome, others - strong tubers. In the latter case, reproduction is carried out by planting the finished planting material. In the other - by dividing the bush. But they both can be propagated by seed. True, this is a very troublesome and unreliable way.
Did you know? There are only eight main flower species, of which only three are cultivated: the Ethiopian calla, calla remnant, calla eliot. The rest are the product of breeding from these.
Tubers
 For reproduction, planting material is bought in specialized stores, where it goes on sale by the end of February. After selecting solid, dense and whole tubers, place them in a tray and place in a cool place with a temperature of 5-7 ° C. Periodically air and turn them over.
To plant tubers in spacious pots should be in April. Each tuber has a clearly visible tubercle, which is the top of the plant. Dip the planting material in the substrate by 2-3 cm, sprinkle it with earth and bring it into a room with a temperature of 20-22 ° C. Make sure that the soil in the pot does not dry out, but do not pour it.
Gradually take out the pots on the balcony for hardening. It is possible to plant a plant in an open ground at the end of spring or at the beginning of summer. The landing pattern depends on the grade. Those flowers that are small, planted at a distance of 20 cm, medium - 35 cm, high - 50 cm.
Dividing bush
 This method is only suitable for the Ethiopian calla variety and its derivatives. It is possible to divide its bush in the fall at planned digging. Escape along with the rhizome is separated from the common bush, trying to save as much land as possible on it, and planted in a pot with a special mixture. The pot should be placed in a closed room with a temperature of 12-15 ° C and high humidity. In early spring, the first shoots should appear, and by the beginning of summer the plant is ready for planting in open ground. Planting material can also be purchased in any cattery.
Seeds
 Breeders are mainly engaged in reproducing calla seeds. If you do this at home, there is a high probability that the seeds will not grow. Soaking the chances of success will help soaking in a biostimulating solution for 5-6 hours. Most often, potassium humate is used for this purpose. After soaking the seeds are laid out on a wet pan, which is placed for 6 - 8 days in a warm place. Make sure the seeds do not dry out. As soon as they germinate, they should be placed in the ground and grown in a warm room until strong shoots appear. Only when the plant is strengthened, it can be planted in open ground. If you sow germinated seeds into it, bypassing this stage, in most cases they die.
How to store calla tubers in winter
Many have a question, what to do with calla after flowering, because the plant is very thermophilic. It really does not tolerate our winters, so at the end of September it is recommended to dig out the rhizomes and, together with the earthy clod, keep them in a cool place, occasionally moistening the soil.
Tuberous callas are to be excavated without cutting off the ground part at the end of September. The material must be removed from the ground, well and gently rinse, so as not to damage the plant. After that, half an hour is kept in a solution of potassium permanganate and washed again. Then they are placed in a cool place with a temperature of 5-10ºC and wait until all the leaves have withered and dried up. Only after that they are removed, and the tubers are sent to storage.
 How to store callas? In paper bags in basements or in a vegetable box in the refrigerator. Ethiopian calla rootstocks are stored for storage, following the same procedure sequence. During the winter, periodically check the condition of the planting material. Ensure that no rotten places appear on it, there are no wrinkled and dried parts. This is the only way to prepare well for spring planting.
Despite the fact that the storage of callas requires some zeal, planting a plant in the garden and caring for it is very simple. It is relatively unpretentious, not interesting for pests. But in the period of flowering the grower pleases with wonderful decorative flowers.