From time to time, poultry owners think about automating the process of egg incubation. This method has several advantages: for example, many modern hybrids of chickens are deprived of parental instinct and are not able to completely sit on eggs for a fixed period. However, the purchase of an incubator by many is repelled by about such considerations: the high price of the device, the complexity of operation and others. But there is a way out - our story about a very simple incubator at a very reasonable price.
Description
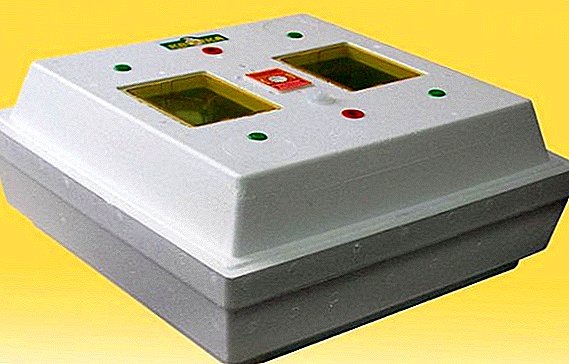
Incubator "Kvochka" Ukrainian production is intended for the incubation of bird eggs at home. The device should work indoors at a temperature of + 15 ... +35 ° С. The device is made of extruded foam. Thanks to this material, the device is lightweight and keeps heat for a long time.
The main elements of the device are:
- incubation box;
- lamp heating element or PETN;
- light reflectors;
- Temperature regulator;
- thermometer.
Did you know? The prototype of the modern incubator was invented in ancient Egypt about 3.5 thousand years ago. It was heated with straw, and the temperature was determined with the help of a special liquid, which changed its state of aggregation with a change in ambient temperature.

At the bottom of the device there are two water tanks. They, and also 8 air vents provide ventilation and necessary humidity of air. In the lid of the device there are 2 observation windows designed to visually monitor the incubation process.
Inside the cover are heating lamps, covered with reflectors, or PETN (depending on version) and a thermostat. The thermostat is responsible for maintaining the required temperature, turning the heating on and off.
The modification "Kvochka MI 30-1.E" is equipped with a fan for more complete and uniform air convection and an egg turning device. Such a turning is carried out by changing the angle of the bottom.
Video: review of the incubator "Kvochka MI 30-1.E"
Specifications
The main characteristics of the device:
- instrument weight - 2.5 kg;
- temperature regime - 37.7-38.3 ° C;
- thermoregulation error - ± 0.15%;
- power consumption - 30 W;
- network - 220 V;
- dimensions (D / W / H) - 47/47/22.5 (cm);
- energy consumption for 1 month - up to 10 kW.
Familiarize yourself with the technical characteristics of such household incubators as "Sovatutto 24", "IFH 1000", "Stimulus IP-16", "Remil 550TsD", "Covatutto 108", "Layer", "Titan", "Stimul-1000", "Blitz", "Cinderella", "Perfect hen".
Production characteristics
The design features of the device and its characteristics make it possible to engage in the breeding of not only poultry, but also some wild species. 
At the same time it is possible to place such number of eggs in the apparatus:
- quail - up to 200;
- chicken - 70-80;
- duck, turkey - 40;
- goose - 36.
Important! Eggs laid in the morning are more suitable for incubation. Because of the biorhythms that affect the hormonal processes of the chicken, evening eggs are less viable.
Incubator Functionality
Modification "MI-30" has an electromechanical type thermostat. The manufacturer claims that the accuracy of the device is not more than 1/4 degrees Celsius. "MI-30.1" is equipped with an electronic thermostat and a digital electrothermometer.
Video: review incubator "Kvochka MI 30" The following units of the device are responsible for temperature readings and its adjustment:
- power indicator;
- thermometer;
- temperature control valve.
It will be useful for you to read about how to choose a thermostat for an incubator, as well as how to make it with your own hands.
Advantages and disadvantages
Among the advantages of incubators "Kvochka" can be identified as follows:
- small dimensions and low weight make it easy to transport the incubator and install in any room;
- simple functionality is clear even to beginners;
- case material keeps heat well even for 3.5-4.5 hours after disconnection from the network;
- in addition to incubating traditional poultry, you can work with quail or pheasant eggs;
- due to the presence of a medical thermometer, temperature indicators can be quite accurately controlled;
- quite affordable price.

The most significant shortcomings:
- the device is not distinguished by durability and reliability (although for such a price category this is a fully justified circumstance);
- the case material is quite unstable to mechanical stress, dirt and microbes are stuffed into its pores;
- the absence of a full-fledged auto-reversal of eggs (again, the price justifies this disadvantage);
- humidification system, as well as ventilation, needs some work.
Instructions on the use of equipment
The incubator is very easy to operate and maintain. It is enough to study the manual for its operation once, and you can no longer look at it.
Work with the device consists of three stages:
- device preparation;
- selection and laying of incubation material;
- directly incubation.

Preparing the incubator for work
Before you begin work, you need to do a few simple manipulations:
- Release the device from the packaging. Remove the pan, mesh and thermometer.
- Treat all parts with potassium permanganate solution, do not wipe dry.
- Place the incubator on a stable, horizontal surface.
- At the bottom of the device, place the pan, fill the tanks with 2/3 of the water (36-39 ° C). Lay the net on the pallet, close the lid.
- Connect the device to the mains (220 V). The fact that the device is connected to the power supply will be informed by the network indicator lamp and 4 indicators of the heating element.
- After 60-70 minutes of work, insert a thermometer into the corresponding socket. After 4 hours, check the thermometer readings, they should be in the range of 37.7-38.3 ° C.
Important! The first 2 days the thermometer will show the temperature of the eggs until they warm up. At this time, do not change the temperature. After 2 days, insert the thermometer into the nest for 1/2 hour.

Egg laying
First you need to prepare the eggs for incubation. This will help you a special device - ovoskop. It is a simple fixture with holes, convenient for fixing eggs in them, very easy to use. It is enough to install an egg in a niche and carefully examine it to the light.
Read more about how to disinfect and equip eggs before laying, as well as when and how to lay chicken eggs in an incubator.
Eggs suitable for incubation should look like this:
- pure shell without cracks, growths and defects;
- have the correct form and one yolk;
- the air chamber must be motionless under the blunt end;
- the yolk should not be mixed with protein or touch the shell;
- have a natural color, the size of the yolk and the air chamber;
- have no signs of blood or dark clots.
Incubation
- The device is closed and turn on the power. Using the thermostat button on the body set the desired temperature. The button must be pressed and held in this position. The values on the digital display will begin to change, as soon as the desired indicator appears, release the button.
- After 1 hour of work, unplug the device, open the lid and place a thermometer inside. Close the cover and turn on the power.
- Eggs must be turned twice a day at intervals of 12 hours.

- Do not forget to control the level of humidity, periodically add water to the baths. Moisture can be judged by the misted viewing windows. It is possible to regulate the humidity with the help of red holes: if a large part of the window sweats up, you need to open 1 or 2 holes. When excess moisture leaves, the plugs should be put in place.
- In the event of an unexpected disconnection of the power supply network, it is necessary to close the windows with a dense, preferably thermal insulating material. The device normally transfers power cuts for up to 4.5-5 hours. If there is no electricity longer, it is necessary to use heaters that are placed on the incubator cover. In such circumstances, it is not necessary to turn the eggs. In the future, if you plan to engage in incubation, and in your area there are emergency outages, you should think of an autonomous power source.
- Check thermometer readings. If the values are outside the range of 37-39 ° C, adjust the temperature using the appropriate valve. The price of dividing the temperature regulator is about 0.2 ° C.

- After 60-70 minutes, make a control measurement of the temperature. Previously, this should not be done, since only by this time it will be completely established.


We advise you to familiarize yourself with the peculiarities of breeding hayboats, chickens, ducklings, poults, goslings, guinea fowls, quails in an incubator.
Incubation period for bird eggs of various breeds (days):
- quail - 17;
- hens - 21;
- geese - 26;
- turkeys and ducks - 28.
Hatching chicks
After hatching chicks do not rush to get them out of the device. Being born is always stressful, and birds are no exception. Wait 30-40 minutes, then place the chickens (ducklings, goslings) in a pre-prepared box with a height of 0.35-0.5 m.  The bottom of the "manger" should be covered with a corrugated corrugated cardboard. You can use fabric (felt, old blanket). In the box you need to put a heating pad (38-40 ° C).
Did you know? Until the early forties of the twentieth century, the poultry farms were equipped with incubators such as "Ukrainian giant", "Kommunar", "Spartak", etc. Such devices could hold 16,000 at a time.-24,000 eggs
On the second day, the air temperature in the room where the chicks are located should be between 35-36 ° C. By the fourth day of life - 28-30 ° C, a week later - 24-26 ° C.
Take care of sufficient lighting (75 W per 5 sq. M). On the day of the appearance of chicks, the light burns round the clock. Then the lights turn on at 7 am and turn off at 9 pm. At night, the "nursery" is covered with a veil.
Device price
In Russia, the price of the incubator "Kvochka" is about 4,000 rubles. Ukrainian poultry farmers for such a device will have to pay from 1,200 hryvnia for modifications "MI 30" and "MI 30-1", up to 1500 hryvnia - for "MI 30-1.E." That is, the average price of the device is just over $ 50. 
Important! If you purchased an incubator in the winter, you can switch it on in the network no earlier than after 6 hours of being in a heated room.
findings
Incubators "Kvochka" have some drawbacks that are fully justified by its low price. In much more expensive models of other brands, functions such as automatic egg turning, a more accurate thermostat, and a better ventilation and humidification system are provided.
But the fact is that for this device the consumer is very precisely defined, its target audience. It is quite suitable for summer residents who want to try themselves in the field of poultry farming, farmers who occasionally engage in incubation. 
Did you know? Egg chickens are most often poor chicks. For the incubation of breeds such as Leggorny, White Russians, Mini Meat Chickens, Moravian Black and others, it is better to use an incubator.
Ease of use makes it quite affordable for beginners. The device does not claim to be a niche professional incubators. In the event that breeding domestic birds did not disappoint you, and you decided to develop as a poultry farmer, you can think about purchasing a more modern and functional model.