Breeders bred a large number of different breeds of layers, but, unfortunately, not all chickens of egg breeds have retained their maternal instinct. For example, Forverck chickens are characterized by good productivity, but they have completely no incubation instinct. For this reason, farmers for breeding this breed can not do without an incubator. And here comes to the aid of an automatic model Janoel 42. In this article, we consider the main characteristics of the device, its advantages and disadvantages, as well as step-by-step instructions for working with it.
Description
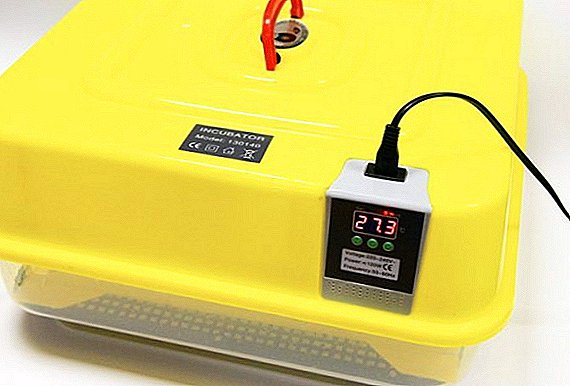
The Janoel 42 Incubator contains a digital automatic device. It is often called the “Chinese” because the Janoel brand is made in China, but the design office and the company itself are located in Italy. The incubator is designed for laying eggs of various sizes - from quail to goose and turkey.
The considered incubator allows minimizing human intervention:

- It is equipped with a temperature sensor with automatic egg turning.
- The display facilitates the development of the device and is located on the upper surface of the cover.
- Special holes in the pan allow you to pour water, while eliminating the need to open the lid.
This design feature provides optimal conditions for incubating eggs.
The Janoel 42 Incubator has a shock-resistant casing with good thermal insulation and energy-saving indicators, and it has a longer service life compared to counterparts from other manufacturers.
Included is a manual in English, and for sale in post-Soviet countries there is also a Russian version of the manual and a user memo.
Important! The laying of eggs in the incubator can be done both vertically and horizontally. However, the rotation angle changes: for a horizontal installation, the tray rotates by 45°, and for vertical - by 180 °.
Specifications
| Weight, kg | 2 |
| Dimensions, mm | 450x450x230 |
| Maximum power consumption, W | 160 |
| Average power consumption, W | 60-80 |
| Swing angle, ° С | 45 |
| Temperature sensor error, ° С | 0,1 |
| Egg capacity, pcs | 20-129 |
| Warranty, months | 12 |
Check out the technical specifications of the best modern egg incubators.
Performance characteristics
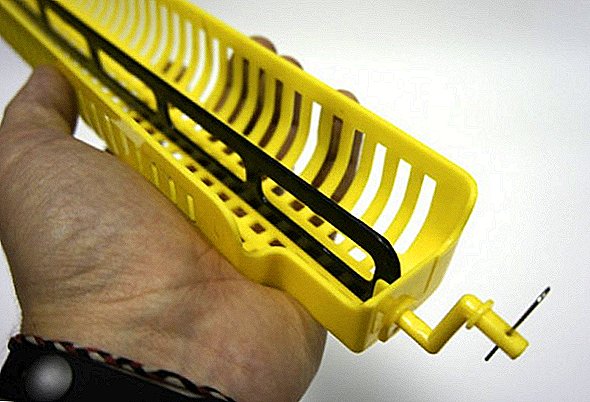
The incubator has 5 trays in which it is possible to hold up to:
- 129 quail;
- 119 pigeons;
- 42 chicken;
- 34 duck;
- 20 goose eggs.
 For laying quail and pigeon eggs, the manufacturer has provided special partitions., which are mounted in the grooves on the tray - this allows you to compactly place a large amount of material.
Did you know? The numbers in the name of the Janoel 42 incubator mean the maximum number of eggs that can be laid in the device.
Incubator Functionality
- This model is equipped with a temperature sensor that allows you to monitor compliance with the temperature of incubation. The temperature controller is located under the incubator cover and displays its readings on the display with an accuracy of 0.1 ° C. There is also a connector for the motor, which allows you to rotate the trays in different directions by 45 ° every 2 hours. Almost all motor gears are metal, except for two, while it is well able to withstand the load, but is not protected from overheating during operation.
- As a heating element, a ring-shaped heater with a large radius is used. Under the lid there is a three-bladed fan, which provides good air circulation throughout the incubation chamber - thus maintaining a uniform temperature for all eggs. From the outside of the lid, the manufacturer has provided a damper, which during the incubation process provides air flow into the device. The same hole also exists in the lower part of the incubator, but it does not close as compared to the upper one.
- At different incubation stages, various moisture values must be maintained in the chamber. That is why in the design of the device, the manufacturer has provided for the presence of two separate trays for water with different area. Thus, during the first incubation period, for the embryo to be heated evenly, it is necessary to maintain the humidity indices within 55-60%, and at the middle stage it is reduced to 30-55%. However, the maintenance of high humidity (65-75%) at the last stage contributes to the quick spitting of the chicks. That is why it is important to use different water tanks at different stages: in the first stage, a large U-shaped container is used, and at the “drying” stage, a small one.
 To ensure maximum humidity, both tanks are poured. When switching from one to another, there is no need to drain the remaining water, as it evaporates well due to the uniform heating of the incubation chamber.
 - A small screen on the side panel shows the temperature in the incubation chamber. When turned on, a red LED lights up above the display, which notifies the user of the start of operation of the device, which is accompanied by a change in temperature on the display. Set the required temperature for incubation (and it is different for each type of eggs) using the Set button. When pressed, the LED lights up, which indicates that the device has entered the programming process. When you press the + and - keys, you can set the desired temperature.
- The manufacturer has provided the possibility of a deeper adjustment of the incubator. To do this, you must hold down the Set button for more than 3 seconds, after which the codes appear in Latin letters. You can switch between codes using the + and - buttons, and the Set button is used to enter and exit. The user can set the parameters of the heater (HU) and heating (HD), you can also set the lower (LS) and upper (HS) temperature limits and temperature correction (CA).
- When you select the LS code, you can set the lower temperature limit: according to the factory settings, it is 30 °. If you set the LS temperature at 37.2 °, you protect yourself from unwanted interference, that is, no one will set the heating temperature below this value. It is better to set the upper temperature limit (HD) within 38.2 ° if you use chicken eggs for incubation. Temperature calibration can be set between -5 and +5, however, in laboratory conditions, the best calibration was -0.9.

 To ensure maximum humidity, both tanks are poured. When switching from one to another, there is no need to drain the remaining water, as it evaporates well due to the uniform heating of the incubation chamber.
Advantages and disadvantages
Incubator Janoel 42 has several advantages compared with other analogues:
- full process automation;
- convenient water supply system;
- high-precision heating of the incubation chamber;
- small weight and dimensions, due to which it is possible to transport this device with ease;
- quiet operation of the device;
- It is possible to turn off the rotation of the trays - simply remove the fuses.
Read about the advantages and disadvantages of such models of household incubators: "Laying", "Egger 264", "Covatutto 24", "Kvochka", "Neptune", "Blitz", "Ryabushka 70", "Little Bird", "Ideal hen".
Many users have noted a well thought out design that is easy to clean and allows compact storage of all the components of this device. It should be noted the presence of an audible alarm that notifies of a deviation in the operation of the device.  The disadvantages of this model are:
- the lack of backup power that could protect the device from power outages or in case of its emergency shutdown;
- no moisture sensor, so the water level in the containers must be checked daily;
- long wires from the temperature sensor often come in contact with the eggs. You must also ensure that the wires are not in contact with water from the pallet.
Did you know? Eggs with two yolks are not suitable for breeding chicks, and twin chickens do not exist. This is explained by the fact that there is not enough space for two chicks in one egg.
In cold weather or when the power is turned off, the plastic case cools down very quickly. Transportation over long distances for this incubator is not recommended, as the hull may be damaged during transportation.
Instructions for the use of equipment
Proper use of the Janoel 42 incubator is very important, as you can get a good result, only by following the manufacturer's recommendations. For the convenience of the user, Janoel company encloses a memo, which describes step-by-step instructions for working with the model being described.
Find out more about the characteristics of the Janoel 24 incubator.
Preparing the incubator for work
- Before starting work, you must select the place where the incubator will be installed. Ideally, the space next to the power outlet will fit; nothing can be put on the power supply. When connecting, you need to make sure that the grid is not overloaded and that the probability of an unexpected power outage is minimized. Do not expose the incubator to sunlight, vibration, or harmful chemicals or other pollutants. It should be remembered that the incubation process should take place in a room where the temperature does not fall below +25 ° C. It is also necessary to take appropriate measures to protect the device from temperature changes.
- Before starting operation, all systems are checked: whether the fan rotates, with the help of a thermometer the correctness of the temperature sensor operation is checked. The body is inspected for cracks and chips. After the examination, a mesh plate is installed on the bottom of the incubation chamber tray, and the trays are fixed on the movable frame. If necessary, they can be separated by plastic partitions (for quail and pigeon eggs). The movable frame set on top of the plate. Now you can go to the trial run incubator.
- Before laying the working material, it is necessary to test the incubator for 12-24 hours. At this stage, you need to connect the motor and check the operation of all systems. However, it is worth remembering that you will not see the work of the engine visually, as it is very slow and there will be no visual changes within 5 minutes. For checking, you can use serifs, which are set by a marker, and after a certain period of time, check the deviation of the trays from the specified marks. This sets the temperature, and water is poured into the tray.
 It is necessary to press the Set button and with the help of + and - set the required temperature. When you first turn on the temperature indicators can skip a little - do not worry, because this logic is programmed by the manufacturer. They gradually normalize, and in the process of operation with a decrease in temperature, the controller will turn on the heating element, and the incubation chamber will warm up.
 - After checking all systems it is necessary to disinfect the incubator. This can be done with a wet wipe. Fine solutions of formalin or potassium permanganate can also be used.

 It is necessary to press the Set button and with the help of + and - set the required temperature. When you first turn on the temperature indicators can skip a little - do not worry, because this logic is programmed by the manufacturer. They gradually normalize, and in the process of operation with a decrease in temperature, the controller will turn on the heating element, and the incubation chamber will warm up.
Egg laying
Before laying the eggs, the incubator switches on and closes the upper ventilation window, sets the required temperature and allows the incubation chamber to warm up.
Important! The temperature for incubating poultry varies for each species. For example, for chickens, it is + 38 ° C, quails - + 38.5 ° C, geese - + 38.3 ° C, and for ducks and turkeys - + 37.9 ° C.
For incubation take fresh eggs. Collect them within 5 days: thus, the probability of embryo nucleation is 4-7% more compared to eggs, the shelf life of which is more than 5 days. In the process of collecting the most optimal storage temperature incubation eggs should be in the range of 12-15 ° C.  Eggs are laid in a warm incubation chamber. Lay them sideways: this situation imitates the natural conditions of hatching eggs. After the bookmark, do not forget to mark this date as the beginning of the incubation period - this is done in order not to miss the moment of chilling of the chicks.
Before laying eggs, it is worth sanitizing not only the eggs themselves, but also the incubator.
In the container for liquid pour 300 ml of water. When pouring into the U-shaped container, humidity in the incubation chamber is at least 55%. After laying eggs close the lid and open the ventilation flap, providing a fresh air flow.
Incubation
During the incubation period for different species of birds, it is necessary to observe different temperature conditions. For example, for chickens, the most optimal temperature is +38 ° C, but this is the average value over the entire period. In the first 6 days it is best to set the temperature within +38.2 ° C, and from 7 to 14 days it is set at +38 ° C.
Unfortunately, this model of the incubator is not equipped with a humidity sensor, so you need to pour water daily, but do not pour more than 100-150 ml at a time.
Hatching chicks
At the stage of preparation for eggs hatching (on the 16th day) it is necessary to set the temperature within + 37.2-37.5 ° С (for chickens) and fill both containers with water. In this case, the relative humidity rises to 65-85%. Three days before spitting, the eggs are stopped.
We recommend to learn how to raise chickens, ducklings, poults, goslings and quail from the incubator.
To do this, remove the movable trays from the incubator, and lay eggs on the mesh plate in a single layer. 
Device price
The disadvantages of the Janoel 42 incubator are compensated by a loyal price. So, in the world market it can be bought for only 120-170 US dollars, in the Russian market it costs between 6,900 and 9,600 rubles. The Ukrainian market offers this device for 3200-4400 UAH. a piece.
Conclusion
The Janoel 42 Incubator is the ideal option for a small farm, suitable for any type of poultry. Its effectiveness has been noted by many users who have exploited the device in question for many years. Such an incubator gives a yield of 70-90%. Before domestic devices, he wins in terms of quality, and before the Italian - in price.
Did you know? The best time for laying eggs is 18:00 or later. With this tab, the first chicks will appear in the morning, and the rest - throughout the day.
For some users, more acceptable domestic-made incubators that consume much less power. For example, the Hen incubator consumes only 50 watts. And, for example, "Cinderella" has a significantly larger supply of water compared to Janoel. Those who prefer a cheaper, but at the same time roomy option, try to give preference to the BI-2: this incubator holds 77 eggs, and its cost is 2 times lower than that of the Janoel 42, but its temperature sensor very often shows incorrect data first days of use.  When buying a Janoel brand incubator, you can be confident in the quality of the assembly and the effectiveness of the device. It should be noted that already the first tab in 80% of users gives the result of 32-35 eggs out of 40, which is 80-87.5% of efficiency. And the use of, for example, an BI-2 incubator gives only 70%.
Simplicity, functionality and convenience make it possible to use the Janoel 42 incubator even to a novice farmer with a small farm as an excellent helper in obtaining bird offspring.
Reviews