Probably, no farm, even with a small number of cattle, will be able to do without the milking machine, which significantly saves time and physical strength of a person. However, not all such devices are equally effective and well perceived by animals, which means that it is worth taking the question of their choice with full responsibility. We suggest you to study the characteristics and technical capabilities of the AID-2 milking machine, to understand its assembly and to learn more about all the advantages and disadvantages of operation.
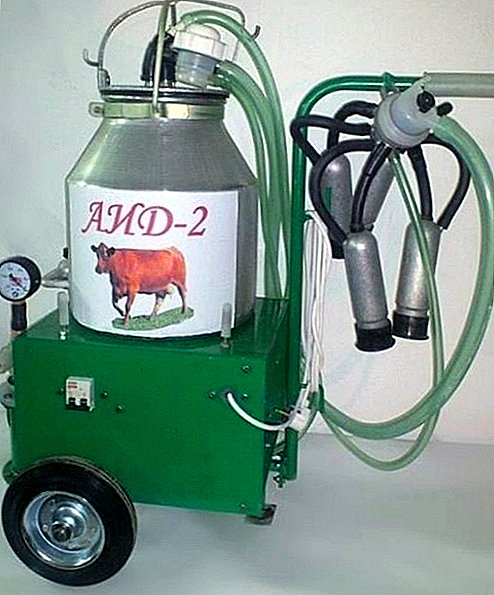
Description and capabilities of the milking machine AID-2
The use of various technological innovations has long been widely used in modern dairy farming, thanks to which it was possible to increase the productivity and quality of any work performed. This is true for AID-2, which allows you to serve the farm with the number of cows up to 20 goals.
Did you know? The “Thistle” machine, created by the Scotsman William Merchland back in 1889, is considered the first successful vacuum milking machine for milking. True, attempts to build such a device have been made before: in 1859, a similar structure was proposed by John Kingman.
Manufacturer
The milking machine was developed in Ukraine Kharkiv LLC "Korntai".
The principle of the unit
The principle of operation of the AID-2 is based on the creation of oscillations by a vacuum unit, due to which the cow nipples are compressed and unclenched. As a result of this process, milk appears and flows through the hoses into the can. Simply put, the movements of the device mimic the natural process of sucking a calf or manual milking.  In this case, the nipples of the cow are not injured and the possibility of the development of mastitis is completely excluded. Of course, this applies only to those cases where the nipple rubber is properly worn and removed, in accordance with all the requirements specified in the instruction manual of the device.
Did you know? The latest modern milking machines are capable of milking up to 50 cows per hour, while manually one milkmaid will be able to cope with only 6-10 animals for the same period of time, while spending much more energy.
Model Specifications
To better evaluate all the features of the milking machine AID-2, it is worth exploring its technical characteristics:
- the device operates according to the push-pull principle of milking;
- has protection against overheating and motor overload;
- electric motor power reaches 750 W;
- food is carried out from the household power supply network in 220 V;
- ripple frequency per minute - 61 (with a possible deviation in any direction within 5 units);
- the volume of the milking bucket is 19 cu. dm;
- working vacuum pressure - 48 kPa;
- device dimensions - 1005 * 500 * 750 mm;
- weight - 60 kg.

At the same time, the instruction states that the manufacturer reserves the right to make any design changes and replace the component parts of the specified milking machine, in order to improve it. Nevertheless, even if these changes are not made, the initial characteristics already make it possible to judge the device’s sufficiently high efficiency, making it an indispensable assistant to the farmer.
Read more about whether milking machines are good for cows.
Standard equipment
The following components are included in the package of delivery of the AID-2 milking machine:
- the device itself, represented by an asynchronous electric motor, a vacuum oil pump, a handle with a receiver and a collection valve, as well as a remote electrical panel (equipped with a starter, automatic protection) and metal engine protection;
- 19 l aluminum can;
- aluminum cap on the can;
- aluminum base manifold;
- two large diameter wheels;
- main, vacuum and milk hoses of 2 m each;
- aluminum collector "Maiga";
- unregulated pulsator ADU 02.100;
- all-metal stainless steel glasses and nipple rubber to them (put on the nipples of the cow);
- tee on the roof to connect the hose line and the pulsator;
- User's Manual.
Assembling all these parts is easy, of course, if you stick to the included user manual.
Important! Even if everything seems to you to be extremely simple and intuitive, you should not engage in independent activities when assembling and connecting the unit. The slightest discrepancy with the factory requirement is fraught with not only damage to the device itself, but also possible injury to the cow.
Advantages and disadvantages
Any technical device has its advantages and disadvantages, so do not be surprised at their presence in AID-2.
Its strengths include:
- dry vacuum pump;
- the ability to use the unit in any climatic conditions, with an ambient temperature of not less than +5 ° C;
- protection of the nipples from injury due to the tight fit of the rubber pads on the glasses;
- possibility of simultaneous milking of two cows;
- relatively small weight of the installation and the presence of wheels to move it.
As for the deficiencies of AID-2, they are credited with high air flow during operation and weak blowing of channels to move the flowing milk. 
The main stages of assembly
In the described milking machine there are quite a lot of both large and small parts, therefore, to collect a structure, it is necessary to first assemble several separate units (conventionally, they can be divided into two main parts: the unit creating a vacuum in the system and the milking equipment, represented by a can, with him glasses and pipes).
The best breeds of dairy cows include such breeds as Yaroslavl, Kholmogory, red steppe, Dutch, Ayrshire and Holstein.
The whole preparatory assembly process is as follows:
- For a start, you can collect glasses by connecting them to the collector (the distance between the ring and the edge of the nipple rubber on the glass should be at least 5-7 mm). The milk tube is inserted into the nipple rubber with a thin end and drawn out until the annular bulge on the other side is fixed by a ring that is put on the nipple rubber. Together with the milk nozzle, the rubber part is inserted into the teat cup, and then the nozzle is passed through the bottom opening of the cup body. The rubber in the glass should stretch.
- Now go to the assembly of the can itself. On its lid there are three openings to which the silicone tubes supplied must be connected: one connects the can with a vacuum balloon located next to the unit of the apparatus, the second provides the connection to the plastic spout of the collector (the milking cups are attached to it) and the third through a special The pulsator (installed on the first can) is also connected to the collector, but on the other side (put on a metal spout).
- The last to be installed on a vacuum cylinder is a vacuum gauge, with which you can monitor the working depth of the vacuum (normally it should be 4-5 kPa).
- Everything, now having placed the can on the stand with the handle, it remains only to pour oil into the oil-casing located in the rear part and it is possible to proceed to milking the cow.
Instructions for use: installation and cleaning
In addition to the rules for assembling and running the milking machine, there are a number of other requirements, in particular, for its installation and cleaning. The main thing is to place the device as far as possible from the cow, so that the noise of the engine running does not frighten the animal and does not cause the cessation of milk flow.
A vacuum valve with a regulator can be placed on the wall of the stall, but only so that at any time you can reach it. With regard to cleaning equipment after work, for these purposes it is desirable to allocate a separate place, with a spacious bathroom or other similar tank that can be filled with a sufficient amount of cleaning solution.
Important! If you rarely use AID-2, then it is advisable to regularly inspect it in time to determine the damage that has occurred and to prevent the leakage of the device.Only milking cups are deepened into this solution, while the cover of the apparatus is placed on the funnel of the bathroom, and the end of the hose is put on the cap. The cleaning process begins at the time of activation of the pulsator.
 The tank for milk is washed with plain water, but immediately after using the device, which will help prevent the appearance of an unpleasant smell. After cleaning activities in a disassembled state, the device is sent to storage in a place protected from sunlight and moisture.
The most frequent faults
For various reasons, the AID-2 milking machine may become unusable from time to time. Most often, users have to deal with the following types of breakdowns.
Learn how and how many times to milk a cow.
Low pressure
The reason for the low pressure in the device may be in violation of the integrity of the hoses or other rubber components, which causes air suction. To remedy the situation, try to eliminate suction by checking the integrity of all connecting elements and, if necessary, replacing the damaged components.
Problems in the work of the pulsator
Pulsator malfunctions are another fairly common problem when using AID-2. It can either work intermittently or not work at all, and pollution is usually the cause of this phenomenon. To solve the problem, you will have to disassemble the milking machine and, after carefully washing all the components of the pulsator, let them dry.  If any damaged parts are found in the cleaning process, they will have to be replaced, and only after that will the assembly be reassembled. In addition, it is likely that a liquid just got inside the pulsator, in this case it is enough just to dry its constituent parts.
Important! Particular attention should be paid to the dryness and cleanliness of its passage openings.
Air suction
Air suction is usually explained by a malfunction of vacuum tubes or rubber components of the apparatus. To eliminate the problem, you should check the tubes and, if necessary, replace them with new ones, at the same time checking the reliability and tightness of all fasteners.
Engine does not turn on
It is likely that at some point when the machine starts, the engine will not be able to start its work. In this case, the problem should be looked for in an insufficient supply voltage or a malfunction of the vacuum pump. Of course, in order to fix the damage, you will have to double-check everything again and, if necessary, repair the vacuum pump.  In general, AID-2 can be called a good solution for small and medium-sized farms, and even rare outages cannot cancel this fact. However, with proper operation and proper care of the device itself, it will serve faithfully for more than one year.