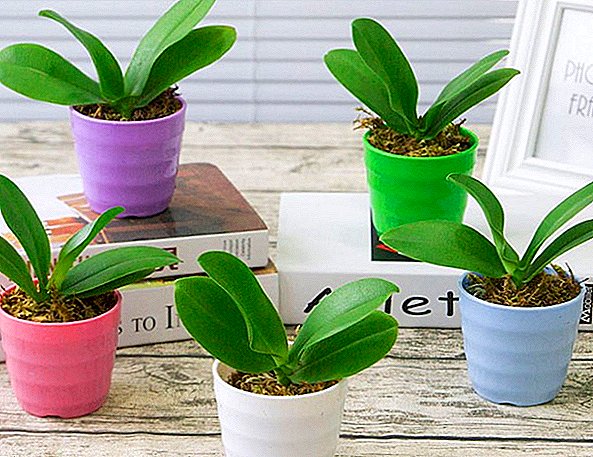
It is unlikely that there will be at least one avid flower grower who would not dream of having an orchid in one of the most beautiful and oldest plants in the world in his home flower garden. However, some fear its capriciousness. Others are afraid of difficulty in its reproduction. This article is for those who are interested in the question whether it is possible to propagate an orchid in the seed way.
Characteristics of flowers
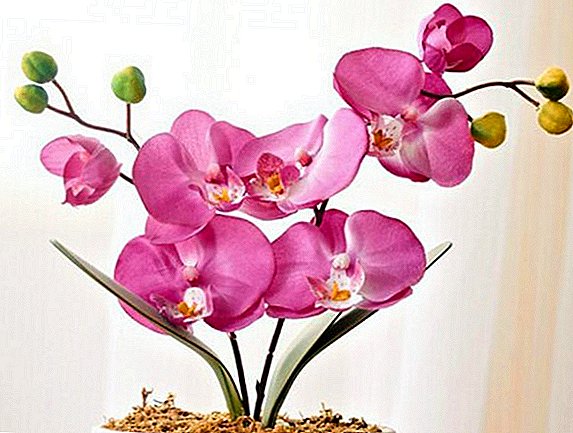
Orchid is ranked as the Orchid family. This is a flowering plant, which today is represented by a huge number of species and varietal forms, differing in stem height, size, shape and color of flowers. In nature, there are about 25 thousand species. Thanks to the efforts of breeders, about 100 thousand hybrid forms appeared.
The root system of this culture is highly developed. It forms a lot of side and air roots. 
The height of the stem can be different. There are compact species, reaching a height of 30 cm, and tall, in which the stem grows to 1 m.
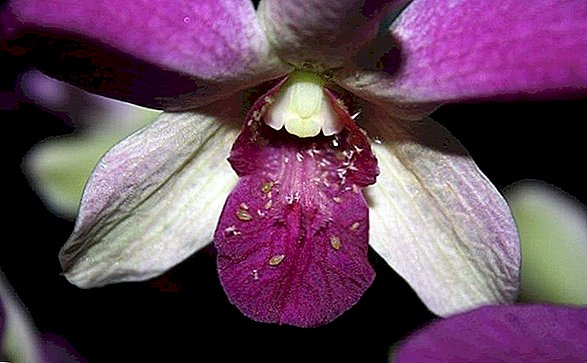
Inflorescences are formed in the form of a brush on the leg or spike. The maximum diameter of the flowers placed in the inflorescence is 25 cm. The petals are white, pink, purple, lilac, yellow, black, dotted with inclusions in the form of strokes, dots. Flowers have a pleasant aroma.
In room culture grown 2 types of orchids:
- Monopodial - The stem is up.
- Simpodial - The stem grows horizontally.
Did you know? In nature, there are varieties of orchids that can not independently carry out photosynthesis. They lead an epiphytic lifestyle - settle on other plants, deepening into their organs mycelium, located on the roots, and thus receive nutrients.
Terms and optimal conditions for landing at home
Orchid can be propagated in 5 ways:
- peduncle peduncle;
- rooting peduncle in water;
- air layouts;
- branch of children;
- seeds.
The latter method is the most time consuming and lengthy. It is suitable for those people who are very fond of home gardening, can set aside time for this process and have enviable patience. Flowering in plants grown by the seed method occurs 4-5 years after planting.
It should be said that breeders did not manage to propagate the orchid for a long time in the seed way. The reason is that the seeds of this flower are very small, they are difficult to collect and plant, besides they have a very low percentage of germination. In 1903, French mycologist Noel Bernard came to the conclusion that orchid seeds do not germinate, because they lack nutrients. It was possible to germinate them only by infecting with microscopic fungi. Thanks to this, the scientist managed to get the first orchid seedlings. 
Today, in order to germinate the seeds, they are planted in a nutrient mixture. Landing is carried out in the spring. In the room where germination will be carried out, it is necessary to maintain the temperature + 25 ... + 28 ° С, humidity 70% and light day for 14 hours. Such conditions can be achieved by organizing a mini-greenhouse or greenhouse.
Preparing for landing
For reproduction by the seed method, an acquisition will be required:
- seeds;
- nutrient substrate ingredients;
- capacity for germination and picks.
Seeds can also be obtained from an existing plant, but for this, artificial pollination should be carried out.
Read also how to get an orchid to bloom.Germination of seed is not made in boxes, but in glass flasks or jars with lids. Flasks can be purchased at a specialty store.
The germination substrate is also unusual - it must be agar-agar, the nutrient medium of Lewis Knudson or the moss-sphagnum. Growing in the last type of substrate - sphagnum - can be problematic because it is difficult to make it sterile and with a certain level of acidity.
Germination is strictly sterile. 
For this you need:
- Sterilize flasks or jars with lids, as for preservation - expose to boiling, steaming, roasting in an oven or microwave. The duration of the sterilization procedure is 30-40 minutes. In the microwave at full power - 3-5 minutes.
- In agar-agar (10-15 g) pour water so that it swollen.
- Bring to a boil distilled water (200 ml).
- Put swollen agar-agar, glucose (10 g), fructose (10 g) in boiling water. With constant stirring, dissolve all the ingredients.
- To achieve the desired acidity of 4.8-5.2 pH, inject 1 drop of potassium carbonate or potash solution, orthophosphoric acid. The pH should be checked with litmus paper, which must be purchased in advance at a specialty store.
- Pour the hot solution into flasks or jars.
- Close containers with lids.
- Place in a saucepan with water for 30 minutes.
- Check sterility by closing the containers with cotton and leaving them in this position for 5 days.
- 10 minutes before planting the seed in the nutrient substrate, it must be dipped in a chlorine solution (10 g CaCl² / 100 ml of water).
Important! Seed material should be planted only in the substrate that has passed the test for sterility. If after 5 days a mold has formed in it, it is not suitable for planting. Requires preparation of a new substrate.
How to plant and grow seeds
For sowing it is also necessary to create sterile conditions.
This is done as follows:
- Flasks or jars are placed in a lattice, which is placed above the steam coming from boiling water.
- Tweezers sterilized.
- The seeds are taken with tweezers and placed in a flask, which is shaken each time so that the seed material is evenly distributed in the substrate.
- Capacities are closed by covers.
- Are placed in a greenhouse, mini-greenhouse or a room with a recommended microclimate.
The timing of the emergence of sprouts will depend on the species grown. Some germinate after a month, the appearance of others is worth waiting for about a year. Sprouts at first resemble small balls. Then they appear sheets, and only then the roots. 
A year later, the sprouts will need to be dive, i.e., seated in separate containers, in an already non-sterile soil. For this purpose, the usual glasses made of transparent plastic. They are filled with sphagnum moss, which is mixed with the roots of fern and pine in equal proportions and crushed activated charcoal (10 tablets / 1 l of substrate). Half an hour before the sprouts are placed in such a ground, it is poured with boiling water.
The technology of picking is as follows:
- Sprouts withdrawn from flasks using forceps in a circular motion. If this is problematic, the substrate is filled with warm water and waiting for it to become liquid.
- Each sprout extracted is placed in a separate cup.
- Capacity put in warm conditions.
- In the future, the sprouts will need to be regularly, as necessary, sprayed from the spray gun with warm distilled water.
We advise you to read how to use cytokinin paste for breeding orchids.
Pot transplant
Plant sprouts in the usual soil and a permanent pot can be 6 months after picking. For planting acquire ceramic or plastic container in accordance with the size of the rhizome.
The soil can also be bought in the store. It is necessary to choose substrates on which packing it is specified "For orchids". It is important that the soil is light, loose, with good moisture and air conductivity. It can also be done by hand.
There are several options for the preparation of mixtures, depending on the species grown:
- Charcoal (1 part) + pine bark (5 parts).
- Pine bark (5 parts) + moss sphagnum (2 parts) + charcoal (1 part).
- Humus (3 parts) + peat (1 part) + charcoal (1 part) + conifer bark (1 part).

If the soil is purchased in the store, then you do not need to disinfect it. Manufacturers took care of this. Mix, cooked with his own hands, to be disinfected. You can hold it for half an hour over the steam, boil, ignite in the oven or microwave, pour 1% manganese solution or, in extreme cases, boiling water. Before planting sprouts in the decontaminated soil, it must be kept for 3-4 days to dry.
To properly plant orchid sprouts in a permanent pot, you must:
- Pour a high layer of drainage to the bottom of the pot so that it takes 1/4 of the tank. As the drainage material used claydite, broken brick, crushed stone.
- Pour a layer of soil on the drainage.
- Sprout to put in the center of the pot.
- Spread out the root system.
- Fill the void with earth, leaving 1.5-2 cm from the edge of the pot.
- Make a light tamping palms.
- Moisturize
Learn also how to water an orchid at home.
Aftercare
For the successful cultivation of orchids you need bright and long-lasting lighting, regular high-quality watering, frequent ventilation.
The lighting should be bright, but diffused. Direct sunlight flower contraindicated. Light day should last from 12 to 14 hours. In winter, the indoor plant must be grown with artificial light from fluorescent lamps.
Favorable lighting can be achieved if you grow an orchid on the eastern and western window sills. On the south side, the light needs to be diffused, and the plant to shade. Some species can grow on the north side, but most in this place will not be able to grow - either they lose their decorative effect or they wither away.

In spring and summer, the orchid feels comfortable at a temperature of + 20 ... + 25 ° С. At higher rates, many species refuse to bloom. In winter, the flower needs a dormant period with a decrease in temperature to + 16 ... + 18 ° C. Humidity all year round should be maintained at 60-70%. Such parameters can be achieved by regular spraying, working a humidifier, placing the pot on a pallet with wet pebbles. When spraying you need to ensure that the drops do not fall on the organs of the plant, as this leads to the appearance of spots.
Watering the flower is carried out as soon as the topsoil dries - usually 2-3 times a week. In the rest period, it will be enough 1 time in 1-1,5 weeks.
Important! In the implementation of watering should be remembered that the orchid normally tolerates short-term droughts, intolerant to stagnant moisture. Even short bays lead to the death of the plant.
Moisturize a room flower with tap water passed through a filter that removes chlorine and harmful impurities, or settled for 1-2 days.
To the flower pleased regular and long flowering, it must be periodically fed. Fertilizers are applied during the growing season - from spring to early autumn, 1 time in 2 weeks. They use universal fertilizers: Agricola, Kemiru Universal, Doctor FOLI Starter, Mister Color - Wagon, or formulations specially developed for this room culture, for example, Mister Color Orchid, Doctor FOLI Orchid.
Fertilizers are applied exclusively after irrigation. Otherwise, there is a risk of burning the roots. Sick plants are not fertilized, in the period of rest and those that were transplanted less than a month ago.
Orchid tolerates transplant poorly. Therefore, it is produced only as a last resort by the method of transshipment. In order not to disturb the capricious beauty once again, it is better to simply renew the topsoil every year. 
How to deal with pests and diseases
If the recommended microclimate parameters are violated or care measures are ignored, the flower loses its decorative effect, begins to ache or be affected by harmful insects.
Of the diseases, the orchid most often threatens root rot. It affects the plant, if it is often poured and kept in too cold conditions. The flower withers, his leaves fall. To save him, an urgent transplant is required. The plant is removed from the pot, cut off the diseased roots, and healthy - treated with an aqueous solution of potassium permanganate or any systemic fungicide. Places after trimming the roots are powdered with crushed activated charcoal or charcoal. The plant thus treated is transplanted into a new soil and pot.
Read more about how to prevent and treat orchids for diseases.
Of the pests for orchids are the most dangerous:
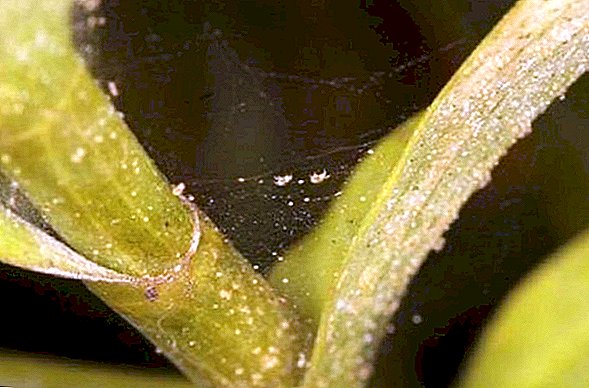
- Spider mite. This is a small sucking insect of 0.1-0.2 cm in size, which settles on plants growing at high temperatures and low humidity. It can be black or red. In the process of life leaves the foliage on the web. The plant reacts to its presence by yellowing and dropping foliage, the appearance of brown spots on the leaves. To cure a flower, it needs to be sprayed with garlic extract, treated with Apollo, Flumaite, Sunmite acaricides.
- Mealybug. If a small insect with a size of 0.2-0.5 cm, the body of which is covered with white bloom and hairs, is noticed on the flower, then this is a mealybug. In the course of his harmful life activity, he leaves on the soil and plant secretions of white color that look like pieces of cotton wool. When it settles on a flower, it slows down or stops growth. To cure indoor culture can be treated with garlic, tobacco infusion, insecticidal means "Intavir", "Fufanon", "Decis".

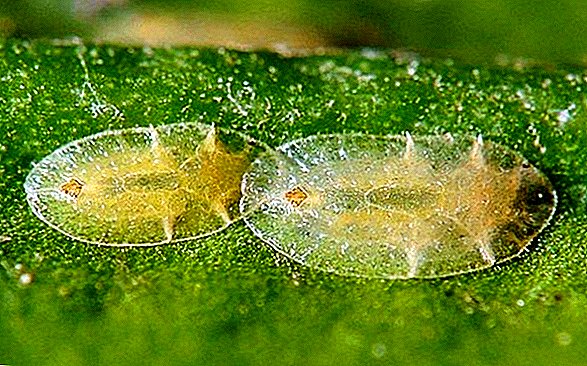
- Shchitovka. This insect can be recognized by hard shell on the back. It leaves behind a sticky liquid on the barrel. They fight it manually - they scrape it off with a brush. Also produce treatment with an aqueous solution of acetic acid, garlic extract. If the infection is massive, then treatment should be connected with "Fitoverm", "Aktellik", "Metafos"
- Aphid. This is a small sucking parasite with a body of green or black color. Maybe with wings or without them. Aphid sucks the juice from the flower, with the result that it fades, its leaves turn yellow and dry out. Insect is destroyed by soap rubbing, spraying insecticides.
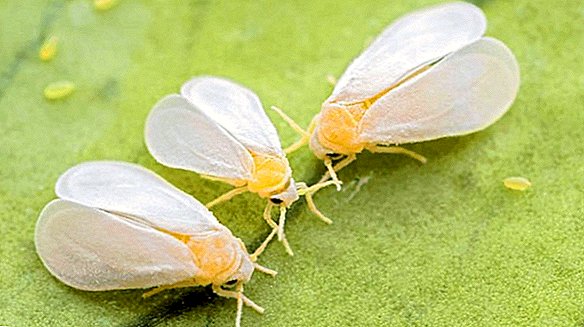
- White fly. It is a small butterfly with white wings. Its larvae eat the leaves. It is necessary to treat the affected plant with tobacco extract, chemicals "Actellic", "Inta-Vir", "Fitoverm", "Aktara".


With errors in the care and maintenance of the room culture can occur characteristic changes in appearance:
- Darkened sheets. This symptom suggests that the flower grows in low light. The pot must be moved to a bright place or an additional light should be arranged.
- Yellowed sheets, they appeared brown spots. This is a sign of the harmful effects of the sun's rays. The plant needs to pritenit or move to a place with ambient lighting.
- There was a brown border on the edge of the sheets. This change indicates low humidity. It is necessary to increase this figure, often spray the flower.
- Buds fall down, not revealed. Attention should be paid to the frequency and volume of irrigation, as this is a sign of excessive moisture.
- The plant does not release flower stalks. The reasons for the lack of flowering are many. Most often, this problem occurs when the flower is too dark.
- Down sheets. This behavior is characteristic of a plant that is flooded or infected with a fungal infection. It will be necessary to dry the soil and treat the soil with any systemic fungicide.
Did you know? The most expensive flower in the world is considered to be the orchid variety Shenzhen Nongke. Chinese breeders spent 8 years on its selection. In 2005, the plant was sold at auction for 202 thousand dollars.
So, to grow an orchid from seed at home is not easy, but real. It is important to adhere to the recommendations for planting, to prepare all the necessary ingredients and devices, and then you will be able to grow your own plants, which will delight you with the flowering of extraordinary beauty.