The motor-block is indispensable in the household and is equipped with different mounted units: the machine can spud potatoes, remove snow, or collect firewood for the winter. At the same time, the list of units that are connected to the most expensive models of the motor-block is limited to 2-3 types of mounted elements.
In this article, you will learn how to make attachments for the motoblock with your own hands and how to use it.
Did you know? The motoblock is a small-sized tractor, but it also has the same parts as the tractor.
How to make potato planter
Planting potatoes in several large vegetable gardens takes a lot of time and effort. Planting can be simplified by using a potato planter, which you can do with your own hands, and then attach to the walker.
It will be best to use a walker with a small capacity. The potato planter will plant the furrow itself, throw potatoes into the holes and cover them with earth.
The following parts are required to assemble this device: 
- asterisks (the teeth on the gear must be 32: both on the master and the driven)
- chain
- channel of the eighth size.
There is also another scheme, but it is more complicated in design and more interesting in terms of assembly. The main task of the device is to plant potatoes at the same distance and at the same depth.
This self-made equipment for the motor-block is used on the soil processed in advance. In this case, the potatoes are planted evenly, and the result will affect the yield of potatoes.
This unit is used as in a small garden, so and on a large field.
Important! Potato planter is suitable not only for potatoes, but also for other vegetables.
To create such equipment will require drawings on paper. For the base frame is taken, and all nodes are attached to it. The frame is welded from channels and steel strips.
The arch is welded to the front of the side members, and the fork for the central link is welded. Fasteners are used for lower thrust. The plates are mounted as a support to the side of the frame.
Steel strips reinforce the frame. For the bunker, you will need 1.5 cm plywood. Cut out parts from it that are fastened with corners. After that the bunker is painted and covered from the inside with rubber. This prevents damage to the potatoes during planting.
 The resulting frame fasten with ripper and wheel axle. When the work is done, you need to brew pins. Steel clips mounted wheel axle.
Steel sheets are used for the wheels. The shape of the wheels must be cylindrical in order to less crush the soil. Also on the wheels should be two hubs, and they are each bearing. Thorns are mounted on them so that the bearings are not contaminated.
In order not to engage in the manufacture of wheels, You can buy wheels from another agricultural machine. For the ripper holder use a square rod. From sheet steel on the ends of the rod are welded clips, mounted inside the rack paws of the cultivator.
A steel or cast iron pipe will be used in the form of a potato planter. Its thickness must be at least 10 cm in diameter. At the bottom of the pipe is welded the device that will make the grooves.
After adjusting the furrow cutter, you need to firmly pull down the ladders.
Such a device has a lot of weight, so before installing equipment on a walk-behind tractor, you need to put a counterweight. This will help the unit not to roll over from the potato planter.
A potato planter needs to be controlled in four hands. One person sits at the walker, the other at the potato planter. Potatoes are poured into the bunker. The motoblock should move at a speed of 1 km / h so that there is an optimal distance between the bushes of the planted potato.
It is not necessary to fill in the planted potatoes by yourself. Made zasypny disks will do it for you.
After planting potatoes, traces remain on the field. You can remove them with the help of feet, they are installed on the cultivator.
Did you know? The first prototypes of the motoblock were created in the XX century.
A potato planter looks like this: 
Potato digger do it yourself
Another option for homemade motoblock do-it-yourself is a potato digger.
Potato digger facilitates the process of harvesting potatoes.
To create this technique will require a welded frame, plowshare, editorial node and drum cleaner.
The ploughshare is a moving part of the potato digger, which is created with the help of steel rods and several pointed steel plates. The sharp ends of the plowshare design should be blunt to prevent damage to the potato tubers. For a welded frame you need an angle made of metal, the size of which should be 60 to 40 mm, as well as a profiled pipe and channel section number 8. Dimensions must comply with the dimensions of the motoblock.
 The drafting site is the main part of the digger for potatoes. To create this unit requires two cylinders of metal. They serve as glasses for connecting sleeves. This provides the interaction between the drive and driven shafts. Hubs are made of metal pipe with a diameter of 25 mm, and transmission stars are welded to them. With the help of keys to the asterisks add sleeves.
The drum cleaner is a difficult part of the digger for potatoes. The equipment design consists of a pair of roller chains of 94 links. They are put on the rods, and this part is mounted on two axes, which are then fixed. This will ensure the mobility of the equipment during rotation. The force of the engine shaft of the potato digger, which is attached to the movable casing, changes the angle of inclination during the movement of the motoblock.
The angle of inclination is adjusted using the slider. You can create it from PTFE. The parameters are selected in accordance with the characteristics of the main unit.
Did you know? One of the first motoblocks was issued to a Swedish citizen Konrad von Meyerburgh in 1912 under the brand name Siemens Bodenfräse.
Digging for potatoes looks like this: 
How to make extra cutters and plow yourself
One of the types of mounted equipment for motorblockers are cutters and a plow, you can create them with your own hands. The cutter allows you to process layers after plowing marshy areas. The plow is used for plowing the land. Cutters are used on soft and constantly treated soil. Plow is used on virgin soil.
Mills are safe in work thanks to a sable form. When the walker rolls to the root or stone, the cutters raise the technique like a car wheel. If the cutters are straight, they cling to the obstacle, which can lead to the tiller tilting.
Knives are attached plates to the base of the cutter. They are welded to the shafts at different angles. This helps the cutters smoothly enter the ground. For knives using carbon steel. To create other parts using steel grade St-25, St-20. They are easily weldable.
You can also make and soil cutters in the form of "crows feet" of steel. Used when working with solid ground. Install them on any motoblock.
"Goose feet" are used for plowing the land for potatoes.
The diameter of the axis for four-row milling cutters for the motoblock is 30 mm.
Manufacturing reversible plow
 Before you begin to create a plow with your own hands, you should consult a specialist, as in the manufacturing process may be difficult.
The simplest and most suitable for beginners is a single-body plow design. The top of the case has a folded feather, which allows you to process an inverted layer of earth. This unit is suitable for the treatment of solid soil.
Important! Follow all instructions when creating the plow. The slightest inaccuracy will lead to negative manifestations while working with him.
To create a plow will need steel with a thickness of 3-5 mm. First, make the plowshare, which should be removable. The cutting part is beaten off on the anvil and sharpened. Next make an oval. For the blank, a pipe with a diameter of 0.5 m is used. Walls should be 5 mm thick. Gas welding cut out the template on the workpiece, which grind grinder. Having made two parts of steel with a thickness of 2-3 mm, they make a plow body, after which the entire device is assembled.
This plow is designed for crumbling and turnover of the arable layer. The plow joins the motor-block by means of a hitch. The unit must be adjusted so that the side face of the field board during operation is along the furrow wall. The ploughshare should be horizontal. The device of the reversible plow allows you to roll off the layer of earth in one direction.
Did you know? In the 1920s and 1930s, in other developed countries, such as Switzerland, England and America, the first motor blocks appeared, but the peak of popularity came in the postwar period.
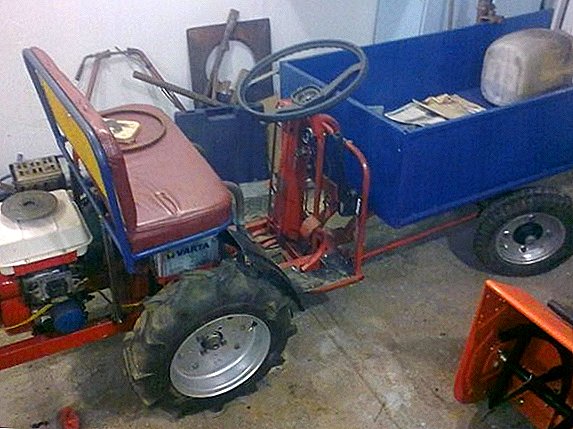
Trailer for motoblock do it yourself
 Motoblock facilitates work when plowing the soil, planting and harvesting crops, and can also carry more than 400 kg of cargo.
Any agricultural worker often needs to transport crops, take out garbage, construction materials. Motorblocks attachments to it, such as a trailer, will help in this.
We suggest you read the instructions for creating a trailer with your own hands.
For starters, it is best to draw a detailed drawing. Equipment should be drawn from several sides, for every detail sign size or length.
Important! For a node or hitch need a separate plan.
Now, with this scheme, we can visualize the scale of the work and make a list of materials and tools for creating a trailer.
Highlights:
1. What are the main components will connect the trailer (twisting bolts or welding);
2. How the movements of the turning parts (bearing, hinge, axle) will be realized;
3. The need for a tipper;
4. Do I need parking stands.
 The dimensions of the cart for the motoblock depend on the carrying capacity. Standard body sizes are as follows: length — 1.5 m, width — 1.15 cm, height — 28 cm. Such a truck withstands 2.5 centners.
Main trailer parts:
- welded frame with a coupling device,
- driver's seat
- frame,
- body,
- one or two axles with wheels.
Important! An old wheelbase can also be used as an axle.
Capacity for the body is made of iron sheets or boards. It would be best to reinforce the corners with metal corners. Top edges reinforced channel or stainless steel strips. On the frame, the body is fixed with the help of three wooden beams on bolts screwed to it.

Since the cart will be mounted on the standard bracket, It is necessary to prepare the necessary console, for example, a hiller. The bottom of the console - the axis. Around her two bearings mounted swivel unit. In order to avoid destruction of the structure, the gap between the bearings is lubricated. The drawbar is driven into the hollow longitudinal hinge and fixed with a locking ring.
After that, we fix the seat for the driver and install the wheels. Also, for convenience, you can make the bandwagon.
Making disc hiller for motoblock do it yourself
Disc hiller is the second largest after the plow and the winch. He cuts the furrows for planting and falls asleep with their planting material after planting. For the manufacture of this unit you need to choose the type of wings. The discs should be made of 2 mm thick steel sheets. They must have bent lower edges.
Important! Disks must be symmetrical. In the case of asymmetric discs, the structure will be deflected to the side and obstruct work.
For the design arrangement, you can use the plowshares. You can remove them from the drill, which has served its time.
The elements can be bolted or welded. Disks are connected using adjustable adapters. The main parts of the tool are: T-shaped leash, screw lanyards and racks. Turnbuckles adjust along the vertical axis of rotation of the discs. To motoblock attached using beams with wings.
 In the manufacture and assembly of the unit, it is important to calculate the ratio of the size and design of the mount. There are two options for creating a disk hiller: with a fixed or variable width of the wings.
To facilitate the work with the unit, it is important to provide for the arrangement of the bearings. In the process of assembling the structure, the hitch bracket without a straddle is applied to the motoblock for fastening the unit, that is, the hiller leash is attached to the bracket with the help of bolts. The stopper is inserted into the square tube, and then pressed to the surface from the outside. Disk hiller ready.
Did you know? In the 1920s and 1930s, in other developed countries, such as Switzerland, England and America, the first motor blocks appeared, but the peak of popularity came in the postwar period.
How to make a snow shovel, tuning the tiller in winter
In winter, cleaning the snow with an ordinary shovel takes a lot of time and effort, in this case You can use the engine tiller.
Roofing iron is used to create the body of the auger of a snow shovel. To create the sides use plywood 10 mm thick. The frame is welded from a metal angle. A pipe 40 mm thick is used to make a handle, and a screw shaft is made from a pipe 20 mm thick. Through-through kerf serves to fasten the metal plate. The parameters of the blade - 120 to 270 mm. The shovel is designed to tilt snow when the shaft rotates.
 Snow moves to the blade in this design dvuhzakhodny auger. Make it from a transport tape 10 mm thick. You can cut four rings from a one and a half meter ribbon. You can do this jigsaw. The diameter of the rings should be 28 cm.
Metal corners are welded to the pipe perpendicular to the plates. For the shaft to enter the sealed bearings, a pair of cuts should be made at the ends and they should be tapped. After that, the shaft diameter decreases. For a key under the asterisk on one side of this shaft, a groove is made.
Important! Bearings must be closed, because no snow is allowed on them.
The design must be put on the skis. They can be made of wooden bars and fasten plastic lining on them. This will provide the best glide in the snow.
The rotary chute is made of plastic sewer pipe not less than 160 mm in diameter. It should be fixed on the pipe of smaller diameter. Attaches it to the auger body. A piece of sewer pipe is attached to the chute; it will guide the discharge of snow.
The diameter of the rotary chute should exceed the size of the auger blade.. This does not delay the advancement of the snow mass.
This type of tuning of the motoblock for the winter period allows you to work with the unit in any weather and soil.
 Finalization of the tiller is carried out without the involvement of specialists and significant costs. Hanging on the walker can be done by hand. If you do everything right, then such an upgraded walk-behind tractor is used for various purposes.