But enterprising and economical summer residents, people in rural areas quickly realized the value of this seemingly useless waste in the garden plot.
And now the original buildings with all sorts of design delights can be seen on many sites.
Material availability
Material for any greenhouse or greenhouse requires a lot of cost. The thinnest film for a greenhouse costs from 40 rubles per 1 meter. One greenhouse is required from 10 meters - and this is only for one summer. Plastic bottles - waste materialfor the autumn-winter season it can be saved for several greenhouses without spending a penny. To serve such a greenhouse will be 3 - 5 years, no less. The neighbors will be happy to help you collect the required amount of plastic, because when this material is burned, many dangerous substances are released into the atmosphere, poisoning the air. Recycling plastic bottles is also an important thing from the point of view of environmental protection, to which many will want to contribute.
Room for creativity
A greenhouse made of plastic bottles with your own hands is not only easy but also a huge scope for imagination. The use of plastic bottles for the construction of greenhouses has become popular recently, so that imagination and imagination will help you to create completely unique designs.
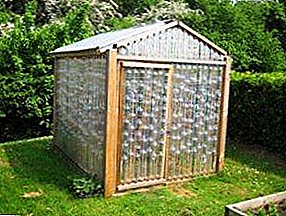
From whole bottles
The simplest greenhouses come from whole bottles., it takes little time to assemble them, and the design is lightweight, durable, and excellent in retaining heat due to air-filled voids.
 If your site has a finished frame for the film greenhouse, it is also perfect for bottle coating.
If you are a novice gardener, then prepare bars, the number of which is calculated based on the estimated size of the building.
Bottom trim is made of bars, laid on foam concrete, cinder blocks. Then at a distance of 1, 5 meters from each other we install vertically bars for walls.
Strengthen upper trim for durability. The roof of the greenhouse is desirable to make a gable, the frame under it for reliability not only is sealed by rivers, but also tightened with a metal grid, so that there is no need to disassemble the greenhouse for the winter. Actually the walls and the roof of the bottles are collected as follows:
- we stretch a kapron thread between vertical columns, girding them. Between them will be our columns of bottles;
- On the lower bar, fasten the first row of bottles, in which you need to cut the top down to the "coat hanger", where the widest cylinder starts;
- each of these bottles will become the base of the columns of the walls;
- we insert them one by one to the top of the binding of the bottle, in which we pre-cut the bottom so that the width of the cut is smaller than the diameter of the cylinder in its widest part;
- the top of our bottle post should fit snugly around the harness;
- according to the same scheme we collect the roof and the door;
- for greater confidence in the strength of the structure, it is fashionable to make an additional strapping in the middle with ordinary adhesive tape.
Approximately also, stringing bottles on wooden slats, and nailing them to the bars, make greenhouses, which are jokingly called "barbeque".
The bottoms, by the way, can be used for decorative decoration of the front garden, arbors, fences for beds. They can be simply screwed onto a wooden base, or you can assemble mosaic patterns of multicolored trimmings.
From plastic plates

To assemble a greenhouse from plastic plates you will need:
- Prepare a sufficient amount of material.
- Cut the narrowed top and bottom of the bottle.
- The resulting cylinders are cut vertically: it is easier to make warmed with a knife.
- It is best to iron each part with a bitter iron through a cloth or paper so that the plastic straightens.
- We sew the plates together, imposing one on the other (we make a seam about 1 centimeter) and first piercing it with a hot awl, and then tightening it with a thin metal wire or a strong thread.
- The canvas should lie tightly on the wall of the frame of the greenhouse.
- To the vertical posts and posts, it is additionally fixed with a rail, fastening it on the screws.
- Plastic is also fastened with self-tapping screws to the upper and lower trim, the roof frame.
- Often, in order to reduce the pressure on the walls of such a greenhouse, rack frames are made, to which 4-6 plates are stitched together. These frames can be nailed to the frame of the greenhouse with ordinary nails.
Greenhouses - Pyramids
At the beginning of the 2000s, pyramidal greenhouses with a square base and walls converging at the top point became popular. Such greenhouses are made now both from bottles and plates.
But the most common option: solid base bottoms to a height of about 1 meter and directly 4 triangular walls, converging at the top.
- The base is collected from the bottles on the basis of the top and bottom strapping of a conventional greenhouse.
- The door is assembled separately from the plates on the frame.
- We'll have to sweat with canvases for the frame of the walls. They must be perfectly flat, tightly sealed to each other.
- Prepare boards with holes to which you attach the plates.
- Secure the top and bottom of the plate with two nails.
- An awl make punctures.
- Take out the top nail and put the second plate, fasten. Then remove the bottom nail, fasten the two plates in place of the seam below.
- Puncture, hold the plates together.
Remember the exact dimensions of the frame: each side will need 30-40 cylinders from the bottles.
It does not require special care, and there is always an abundance of materials for its repair.
IMPORTANT! When starting building a greenhouse, make sure that all bottles are the same size.
If a multicolored material is used, it is best to collect the north side from green and brown cloths, and South - always from transparent.
A good result gives the alternation of transparent and colored containers.
What plants are suitable for?
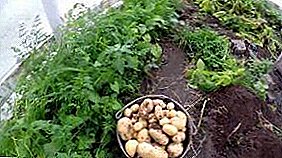
 Greenhouses from plastic bottles are great for growing seedlings of cabbage, tomatoes, eggplants and cucumbers.
And if the cabbage in June can already be transferred to the open ground, like tomatoes, then cucumbers, zucchini and squash will be great fruit in this place, protected from sudden changes in temperature, even in September.
As in any greenhouse, in these constructions it is possible to make additional protection from the cold: install arcs over the beds and stretch the film, arrange warm beds with bio-heating.
In such greenhouses excellent one-year saplings of currant, raspberry, blackberry, they are transplanted in the winter and young strawberry bushes, strawberries, additionally covering lapnikom.
Mini greenhouse from a plastic bottle
The most common use of plastic bottles is to create mini-greenhouses.
First, by cutting the bottom and placing the bottle over the plant, you get a unique individual means of protection from hypothermia, drought, wind. To ventilate the sapling or water it, just unscrew the cover!
Secondly, by cutting horizontally the “door” two-thirds of the length of the bottle on three sides and filling it with half of the ground, you can get a mini-nursery.
Freshly planted cabbage bushes, tomatoes cover with frost bottles.
How to make a mini greenhouse from a plastic bottle, you can in this video:
They create an excellent microclimate for germination and rooting cuttings of fruit crops.
Do not rush to throw in the bin an empty plastic bottle, if you have a cottage. Remember how many useful things you can make from it, saving a lot of money.