In horticulture, greenhouses are considered one of the most effective fixtures. With their help, it is possible to obtain earlier harvests, cover plants that are not resistant to frost, and even have fresh greens during the cold season.
At the same time, it is not necessary to spend money on the purchase of a ready-made greenhouse; it is quite possible for an ordinary gardener to build such a structure.
What benefits does a greenhouse give?
Installing a greenhouse on the garden plot allows you to decide the main the problem of any gardener: inconsistency of climatic requirements of cultivated plants and the weather in fact. Heat in the volume of the greenhouse appears under the influence of sunlight penetrating through the translucent walls and heating the internal volume.
Cultivation facilities of this type are useful in solving problems such as:
- hardening of plants before planting in open ground;
- growing greens from seeds in early spring and late autumn;
- winter storage of perennial plants that are sensitive to sudden changes in temperature, etc.

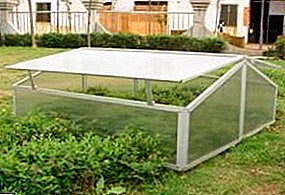
Accordingly, a lightweight greenhouse can facilitate growing absolutely all kinds of plants, traditional for the gardens of our strip and their dimensions fit in such a structure. At the same time it will not be necessary to engage in serious construction. The very idea of a greenhouse involves the use of lightweight and quick assembly structures.
Polycarbonate: the pros and cons
As one of the varieties of plastic, polycarbonate can be produced in a wide variety of types. The most widespread monolithic and honeycomb. However, monolithic polycarbonate is unsuitable for gardening, because it retains heat poorly.
Cellular Variant inherent such merits, as:
- excellent thermal insulation due to air-filled structure
- low weight
- good bandwidth for light
- impact resistance

However, there are limitations:
- quick failure with improper installation
- good weather is necessary in warm weather
- sheets of material change geometry when heated
Recommendations for the construction of their own hands
First of all, it is worth deciding on placement the buildings. The greatest value in the manufacture of greenhouse polycarbonate with their own hands will have the following points:
- Orientation from west to east. This will ensure maximum flow of incoming sunlight.
- The internal atmosphere will be very humid, so you should carefully choose frame material greenhouse for cellular polycarbonate. Ideally, this should be a high quality mounting metal profile, with serious anti-corrosion protection.
- Polycarbonate greenhouse dimensions should be multiple standard dimensions sheets (210 × 600 cm). This will simplify cutting and reduce waste.
- The form structures. If the height does not exceed 1-1.5 m, then it does not make practical sense to build a semicircular greenhouse on arched arcs. The temperature in it will differ little from the street, because strongly curved polycarbonate begins to reflect most of the radiation back into space. Therefore, a greenhouse with flat walls and a roof is more rational.
- It is possible to strengthen the building not only by strengthening its structure, but also right location. So, if you attach a greenhouse to the south side of a house or another serious structure, it will be protected from wind gusts.
- Cellular polycarbonate (4-6 mm thick)
- Silicone sealant
- Prototype tape for waterproofing seams
- Metal mounting profiles.
- Scissors for metal
- Screwdriver
- Self tapping screws
- Sections of a metal pipe with a diameter of 40-50 mm and a length of about 1000-1300 mm
- Garden drill
How to build a polycarbonate greenhouse with your own hands?
Manufacturing technology can be divided into several stages.
Stage 1. Drawing up a drawing.
Given the original size of the polycarbonate sheet, it is convenient to divide it into four pieces 210 × 150 cm in size. It follows that the easiest way is to build a greenhouse with walls either 420 × 150 cm or 210 × 150 cm. Considering the height of the foundation is 20 cm, the total height of the greenhouse will be 170 cm without taking into account the distance to the ridge.
Stage 2 Preparation of material and tools.
To work will need the following:
Also required work clothes and means of protection.
Stage 3 Foundation construction.
The total mass of the greenhouse can reach several tens of kilograms. Therefore, you can not do without a reliable foundation. It will take him for combat sail.
The easiest and most effective foundation for a greenhouse, it represents four metal pipes dug in the corners of the structure. Using the drill, you can simplify the work. To deepen the "piles" of the foundation should be 80-90 cm, leaving 20 cm above the ground for mounting structures.
4 stage. Build a frame for one wall.
It will be easier to avoid mistakes if the walls of the greenhouse build successively. To begin with, the metal mounting profile is cut and cut. From the obtained with screws formed frame for one wall. Further, it is fastened with screws to the ready-made foundation.
Stage 5 Cutting polycarbonate and wall cladding.
According to the dimensions outlined in the drawing, a sheet of cellular polycarbonate is cut out and mounted on the wall of the greenhouse. Fasteners can be carried out two ways:
Striped metal. In this case, the joint of two sheets on top is covered with a strip of aluminum tape. The tape is fastened to the frame with self-tapping screws, screwed into its middle and passing between the sheets of polycarbonate.
H-shaped profile. This profile is specially created for such operations, therefore, significantly speeds up the work. The profile is fixed in the right place on the frame of the greenhouse, and then sheets of polycarbonate are simply inserted into it.
IMPORTANT. It is necessary to cut out and mount sheets of polycarbonate in such a way that the internal cavities are located either vertically or at an angle to the horizon. This will ensure quick removal of water and prolong the service life.

In any case, sheet joints should be machined after installation. silicone sealant. The lower part of the finished wall is sheathed with either a metal strip or a durable board treated with an antiseptic.
Other planes that make up the structure of a greenhouse are formed in a similar sequence of actions. If the roof is planned not flat, but with slopes, then the framework will have to be complicated by adding it truss system.
6 stage. Door installation.
The location of the door to the greenhouse is selected in advance. On the width of the door, two mounting profiles are installed vertically, which act as a doorframe. The loops will be screwed to them.

Actually the door can be made of polycarbonate scrapsbolted to any plastic base or wooden slats.
To build a polycarbonate greenhouse with your own hands is an affordable event for a home craftsman. It is enough to understand the features of the material and have basic building skills to achieve the desired.