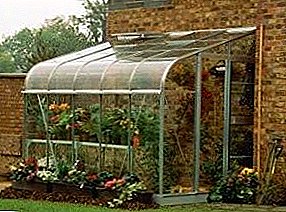
Greenhouse on the plot significantly expands the possibilities for the gardener. But not always it turns out to allocate free space for it.
Therefore, often the wall greenhouse is located directly at the wall of the house. This design saves not only space but also time, because it takes much less time to create and maintain it than in the case of a stand-alone greenhouse.
How to place a wall greenhouse
The only place suitable for installing a wall greenhouse is south wall of the house. When placed against walls facing the other side of the world, plants will not be able to receive enough solar energy throughout the day. In addition, a shaded greenhouse will not have time to warm up to the desired temperature.
IMPORTANT
It is unacceptable to have a wall greenhouse near insufficiently durable structures. It creates a certain load on the wall, and if it is made not of brick or stone, the whole building may be destroyed.

Fig.1 Location wall greenhouses
In the vicinity of the greenhouse there should be no trees and tall shrubs. Their crowns will create unacceptable shading. Same rule concerns and climbing plantsable to braid the whole structure and block the sunlight.
Preparatory work
Before you attach a greenhouse to your house with your own hands, you need to do some preparatory work, a description and photos of which are presented in this chapter. An important preparatory stage is developed drawingsfor which the future single-pitch greenhouse will be built. The drawing should indicate the size of the structure, including its length and height. Both of these measurements should not exceed the dimensions of the houseto which you plan to attach a greenhouse.
IMPORTANT
When deciding on the overall dimensions of the greenhouse, one should take into account the peculiarities of the crops that are planned to grow in it. High and climbing crops need more space. Respectively, the height of the greenhouse must provide some free space.
Also, before the start of construction, it is worthwhile to prepare the foundation. Most often used for such purposes shallow depth foundations. The sequence of actions for arranging the foundation of this type will be as follows:
- Around the perimeter of the future greenhouse digs trench depth 40-50 cm. Width - 25-30 cm.
- From boards, sheets of hardboard or chipboard mounted formwork.
- In the trench is placed reinforcing mesh to strengthen the structure.
- Installed supporting posts.
- Poured concrete mortar.

Fig.2 Preparation of shallow strip foundations
5-7 days later the solution will harden completely and you can proceed to further work.
Do-it-yourself greenhouse: assembly instructions
Directly assembly of the greenhouse consists of several stages.
- Creation of the frame.
To do this, first to the wall of the house are attached to the inner tube frame. The optimal cross-section of frame tubes - 20 × 40 or 40 × 40 mm. On the wall, the pipes are fixed on brackets or with clamps. If the wall material allows, you can drill holes in the pipes and fix them with dowels.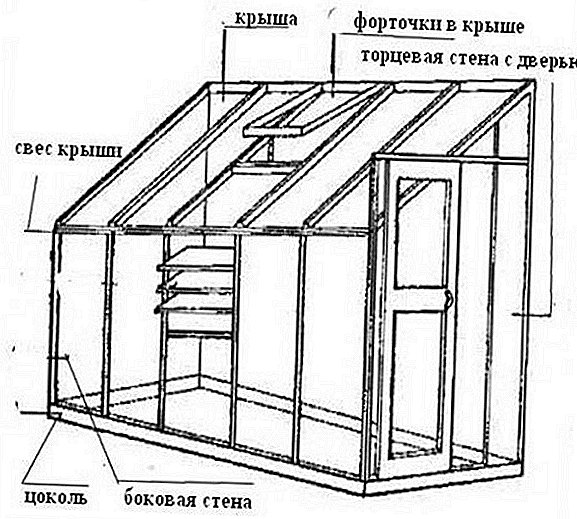 Fig.3 Odnoskatnaya greenhouse do it yourself: drawing frame
IMPORTANT
From the overhang of the roof to the top point of the wall greenhouse should remain not less than 40 cm. Otherwise, the greenhouse may be damaged by the growing icicles. - Installed horizontal cross tubesgoing from the wall to the outer supports. They can be fixed either with screw joints or with welding.
- Mounted sloping rafters from the same profile pipes. If the pipe has a rectangular cross section, then it should be installed on the edge, which will provide greater rigidity of the structure. The slope of the rafters can be arbitrary, but not less than 30 degreesto provide easy gathering of snow. Rafter pipes should extend beyond the outer edge of the frame 20-25 cm.
- With a greenhouse width of more than two meters, you will need installing additional spacers. For these purposes, a cheaper pipe section 20 × 20 mm.
Having completed the frame assembly, it is necessary paint all metal structures, it will save metal from corrosion. - Roofing device. As a roofing material in greenhouses of this type, it is best to use either cellular polycarbonate or a durable film.
In the case of polycarbonate, it can be fixed in two ways:- on glue;
- using roofing screws.
If the size of the sheets does not allow to completely cover the entire roof area of the greenhouse, then it is best to use the joints at the joints. special connecting profile for cellular polycarbonate. In the absence of such joints can be glue flexible roofing waterproofing.
- Is formed long outer wall. The procedure here will be the same as when the roof structure.
- Installed side walls.
- In one of the side walls settles down greenhouse door. The easiest way is to use the already finished door frame, which often remain after the repair in the apartment. If such is not available, or it does not fit in height, then the similarity of the box can be made with your own hands.
For this, two pillars and a cross bar are installed. It is best to install these pillars at the stage of pouring the foundation. The door itself, which will be equipped with an attached lean-to greenhouse, can be made by hand from the remnants of cellular polycarbonate. To do this, pieces of material of suitable size are hung on a rectangular frame, and door hinges are attached to the supporting posts.
 Fig.3 Odnoskatnaya greenhouse do it yourself: drawing frame
Fig.4 Fastening polycarbonate joints
Cheaper option the organization of the entrance - hanging cloth from dense polyethylene. In this case, the size of the sheet must exceed the size of the entrance 40-50 cm both on the sides and vertically. The film reserve will be required for a tighter closing of the opening.

Fig.5 Ready wall greenhouse attached to the house with your own hands - photo
Upon completion of all work must be made complete sealing of the resulting structure. If even small gaps remain, then the greenhouse will not be able to reliably retain heat and the plants may die when frozen.
As a sealant, you can use silicone based sealants. Fit and roofing bituminous sealant.
IMPORTANT
Installing a wall greenhouse, it should be understood that the air inside it will have high humidity. it may adversely affect the condition of the wall, near which there is a greenhouse. Therefore, it will not be superfluous to disassemble it in the hot summer months to dry the walls. Remove the frame makes no sense, quite enough remove the walls of the greenhouse.
The option with a wall greenhouse is interesting because the design is very easy to assemble. The main load in it is transferred to the solid wall of the house, which allows you to use less durable frame. In addition, near the wall, the greenhouse acquires wind protectionthat avoids chilling in windy weather. In this case, the assembly does not cause difficulties even with only basic skills in construction work.