Probably every owner of a large plot or garden wants to maximally ease the laboriousness of the land works and reduce the time of tillage to a minimum, therefore gardeners and tend to get a walk-behind tractor and various equipment to it. If you are a happy owner of this useful technique and like to grow a lot of potatoes on your plot, then it makes sense to think about the need for a potato shovel for mechanical harvesting. Now you can buy various designs and advanced equipment for all types of tillers, but you can make a little effort and make a digger for a tiller with your own hands. In this article we will acquaint you with the varieties of this device and tell you how to make a potato digger yourself.
Do-it-yourself potato digger - design features
Household potato diggers are of two types: simple and vibrational. The principle of operation of all kinds of potato diggers is one - plow, ploughshare or teeth are immersed in the soil and the potato tubers are removed on its surface. Thus, the gardener will not need to manually dig up potatoes from each hole - the garden unit will do it for him. Both types of diggers can be made independently from improvised means or you can buy some components, the cost of which is small, and save your budget.
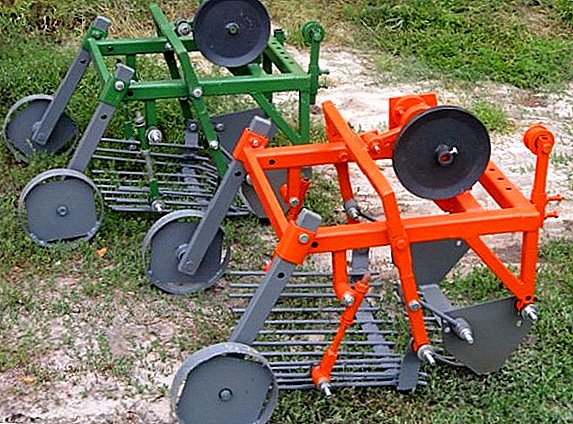
Simple digger It is a hinged equipment in the form of a pointed curved iron sheet, to which rods are fan-shaped. This mini-plowshare cuts the soil and picks up the tubers along an expanding fan of twigs, at the same time sifting out the excess earth. A simple digging machine that attaches to the motoblock mechanizes potato harvesting.  Vibration Digger represents a conveyor potato for use when working with a walk-behind tractor. Equipped with a screening grate and wheels. The mechanism of harvesting with such a digging machine is simple: the soil is cut with soil, which goes along with the potato tubers to the grid, where the root crops are sifted off from the clods of earth and then rolled along the screening grid to the soil surface.
Important! It makes sense to make a potato digger with your own hands for the cultivation of plots with soils of light and medium gravity.
How to make a potato digger with your own hands: choose the material and tool
In order to make an ordinary homemade potato for a motoblock, you need the following materials:
- a frame of welded between the corners, the size of which is 40 by 40 mm;
- 1.3 m length of pipe or channel;
- fittings with a diameter of 10 mm;
- metal sheet with a thickness of 7 mm and more for the sides of the fence and plowshares;
- sections of square pipes or channels for metal racks - 8-10 pieces;
- rotary metal drum and chain to transmit rotation;
- wheels, bolts and hardware.
Did you know? Vibration potato for the motoblock provides cleaning up to 95% of the entire crop of potatoes, and a simple fan - up to 85%.Equipment and tools needed to create a potato digger do it yourself:
- welding machine;
- drill and drill;
- scissors for metal;
- hammer wrenches;
- Bulgarian.
Features of making simple potato digger
A simple potato digger is an improved curved spade that sinks into the ground below the level of potato tubers and pushes them to the surface. Having correctly calculated the width of the digger and the angle of inclination of the cutting tool, it is possible to loosen the ground during harvest, which will not need digging. Making a simple potato digger is elementary - three sheets of iron are welded to each other and a special attachment is attached to the motoblock. The simplicity of the design and the small number of component parts allow it to be made by a novice agricultural work mechanizer who knows how to work with a welding machine.
How to make a rock plaster
The simplest hiller is the Lister type, which consists of two pikoobrazno welded wings of sheet iron with a thickness of at least 2-3 mm. This device has a fixed length of capture due to fixed elements, the tip of which pierces and loosens the ground, so every gardener who plans to make a simple potato trowel with his hands must first make drawings of the device, taking into account the width of the rows between rows acceptable for him, when they are planted. As a rule, it is about 60 cm, and industrial hillocks have a width of only 30 cm. To manufacture an excavator, you need to take a sheet of metal at least 3 mm thick, triangular in shape, the base length of which is from 30 to 60 cm, and about 30 cm in height. This element Okuchnika bends along the height of the triangle, thereby making the edge piercing the ground, small rectangles in the form of wings are welded to it, the span of which will be equal to the width of the rows. To the main triangle, 7-10 rods of about 30 cm long are fan-welded. For better rigidity, the edges of the triangle are reinforced with an iron bar with a minimum thickness of 3 mm.
Important! Rigid rack-mount will not overload the engine tiller during operation.
Fastening potato digger
To attach the potato digger to the motoblock, you need a metal rectangle of 50 * 520 mm, the thickness of the metal of which is not less than 10 mm. Holes are drilled on it to regulate the depth of digging the tip of the digger into the ground to avoid cutting the tubers. It makes sense to increase the rigidity of the tip and the wings by connecting the edges of the wings with an iron plate, to which a construction stand will be welded, bearing the full load of the earthworks during the potato harvest, as far as possible this metal part can be hardened.
How to make a potato shovel type
Making kopalki potato screen type with their own hands is a little more difficult, but very real in execution. First you need to make the individual components of this useful unit, connect them with each other, check the operation of the mechanism, and the potato shovel for the motoblock is a self-made vibration machine, ready to harvest potatoes. We will study all the steps of making a digger for potatoes for a motoblock. Before making this mechanism, it is recommended to make a schematic drawing of a potato-digger for a motor-block with an indication of the dimensions of the parts for clarity when measuring the material and further welding.
Frame making
To begin with, it is recommended to make the frame of the screening machine For this, a rectangle measuring 120 * 80 cm should be welded from a square tube of 40 * 40 mm (or corners), which should be polished with a grinder. Then welded to a quarter of the length of the rectangle of the frame of a square tube 40 * 40 mm for lintels and further installation of the rods. In the other part of the frame we make a mount for the wheel axle. To do this, from the outside, the corners must be vertically positioned and welded two sections 15 cm long with a diameter of 30 mm and drilled in each pipe through a hole with a diameter of 10 mm.  Then you need to install several vertical racks - to do this, you need to retreat 5 cm on both sides from the mounted jumpers and weld on a square 3 * 3 cm in length and 50 cm in length, then retreat another 20 cm and weld 40 cm racks, after which retreat 40 cm and weld 30-centimeter stand, the result will be a kind of ladder. Now you need to connect the rack metal strip, whose thickness is 0.4 mm, at an angle of 45 degrees, in the end you get a triangular design.
Did you know? The first potato digger with the use of horse traction was created by the Russian blacksmith in 1847.
How to make a pitched board and ralo
The next stage of making potatoes digging with your own hands is the welding of the working part of our device - rala and pitched board. Ralo is necessary for digging up potato tubers from the soil and then feeding them onto a pitched platform of iron rods. For the construction of the ral, two metal sheets measuring 400 * 400 mm and 0.3 mm thick are needed, in each of which you need to make a hole for the bolt, and also drill a hole in the racks, stepping back from the edge upwards 5 cm, and fasten these metal plates firmly to frame bolted. Then a metal plate with a size of 30 * 70 cm is bent conically in the central part with hammer blows and welded to the side sheets butt - it turned out that the edge of which needs to be sharpened for better penetration into the ground.  Pitched board is welded from 8-10 metal rods or pieces of rebar about 1.2 m long, one end of which is welded to the bottom of the ral, and the other goes beyond the limits of the digger and moves fairly freely. The rods are welded in parallel at a distance of about 40 mm. To strengthen the structure at the end of the frame on either side of it, you can weld a channel about 30 cm long - these will be risers, to which the bar is welded. The bars will then be welded to it at a distance of two-thirds of their length for the strength of the pitched board. The free edges of the twigs during the harvest process will vibrate and stick the ground stuck to the roots. It is recommended to weld metal plates on the sides of the bars of the pitched plank in order to prevent the potato tubers from falling out of the lattice structure.
Selection of wheels for construction
We have already familiarized with the main stages of how to make a potato digger with our own hands, now we need to choose wheels for the construction of such options:
- metal - suitable for use on solid soil, their weight makes the digger heavier and improves the performance of the ral;
- rubber simple - used to work on loose soil, on wet soil, they will not give the opportunity to transport garden equipment;
- rubber with a tractor tread - will give the opportunity to use the design in wet soil without slippage, they are bulky and heavy.
Important! Wider wheels will facilitate the movement of the potato digger over garden beds.
Manufacturing fasteners
And here we are at the final stage of making potato diggers with our own hands - the manufacture of fasteners and the final assembly of the mechanism. The gear unit with bearings is attached to the axle, the transport mechanism is assembled from wheels, roller chains, metal discs. The axis as a connecting bridge should be attached with asterisks, discs are welded to it, to which the wheels are attached. The chain will transmit energy and rotate the shafts, setting in motion the potato digger mechanism.
Then the letter "G" make the holder. The long end is attached to the radial part that connects to the motor-block, and the short end is welded to the tip of the ral. To control the angle of inclination of the ral, the best option would be to connect the beam with the potato tender with two or more bolts.
As a result of all the work done, you will have a potato digger for the motoblock, it is very easy to operate, and it will also be partially collapsible and transportable due to the bolting of the mechanism. Such a digger for potatoes will help to remove the tubers from the soil, clean it a little from the ground and carefully lay it on the surface of the furrows. The owner of the plot will only harvest and provide him with optimal conditions for storage.