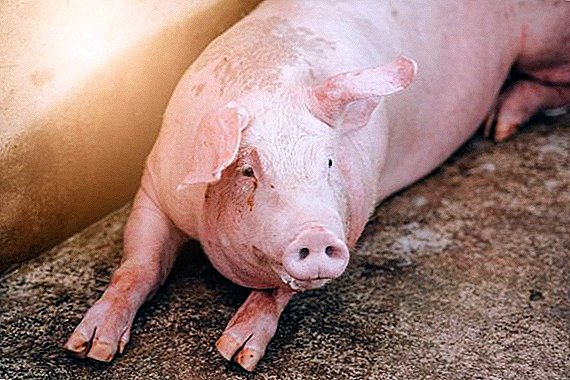
Many contain an impressive livestock of animals at their farmstead. In such cases, there is an acute problem of feed processing - appetites for the "wards" are considerable, and the feed is prepared very often. To do this, you also need equipment, and industrial designs cost a lot. But the solution is still there - to collect a grain extruder with your own hands.
Description and Purpose
This mechanism is intended for the processing of raw materials (grain, straw, etc.) into a "light" animal feed. The necessary conditions for obtaining such products are high pressure and high temperature.
With your own hands, you can also make a grass chopper for chickens, an ovoscope, and even a mini-tractor.

This kind of work leaves a mark on the whole structure. Among the main parts and assemblies are:
- the frame (which is the bed), which will hold the entire apparatus;
- receiving bunker;
- drive in the form of a belt;
- engine;
- gearbox;
- screw;
- fiera;
- knife;
- cylinder;
- cuff;
- adjusting key;
- washers;
- control panel.
Learn how to make feed for chickens and chickens at home.
Of course, industrial designs are more complex and productive, but the owner of the farmstead will have enough home-made option. If there is a fairly powerful electric motor on hand, then you can get up to 40 kg of quality mixture per hour.

Principle of operation
Having learned what the extruder is intended for and how it can help in preparing the feed base, let’s look at the processing process itself.
Most extruders (both factory and self-made) are distinguished by their versatility. In addition to the grain mass, the following materials will be suitable as raw materials for processing:
- rye and soy;
- meal and cake obtained from these crops;
- fish and meat meal.
Important! During operation, the body warms up almost immediately. - Be careful not to touch it.That is, the unit can "give out" any feed, and this is a direct savings - no need to buy bags every weekend in the market, you just need to fill in the wheat or soybeans from the available stocks. In addition, such food is easier to digest by animals (which well affects the weight gain figures).
The processing starts with the fact that the raw material that has entered the bunker is fed to the injecting auger, the warming washers of which soften the grain. The screw, rotating, moves the products to the fiera. It is there that the heat treatment and the main crimping takes place.
The last stage is the passage through the disk, controlled by the handle (by changing the position, you can set the desired fraction value). A small roller with a knife that cuts the resulting "sausages" is picked up by a spring to it. They come out through holes in the form of a thin (up to 3 cm) dense tow. Note that this is typical for large, industrial units. The self-made output is adjusted right from the fiery.
An extruder designed for the preparation of feed is advantageously distinguished by the fact that even stale and slightly aged grain can be put into use - with this heat treatment the mold is "neutralized".
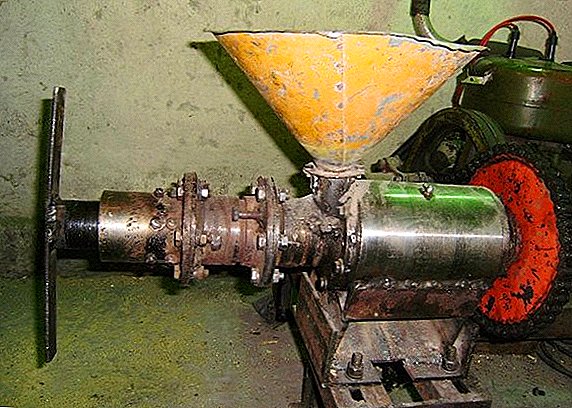
How to do it yourself
To assemble such a device at home is possible. To do this, you need suitable parts and fitter skills (although familiarity with turners is also desirable). Let's start with the preparation of "iron".
Materials and tools
First pick up electric motor. Here you need a 4 kW motor (1,400 rpm) - to work with a 220 V electric household power supply, this is the best option. A less powerful "engine" will not cope with such loads.
Did you know? The principle of extrusion is actively used in the food industry. Corn sticks and macaroni are made in this way.

Often for such purposes take the old engines that have not been used for years, dropping dust in the corner. In this case, the unit will have to be thoroughly inspected - the housing is disassembled, the condition of the rotor, winding and bearing is checked.
Elementary diagnostics will not hurt either. Simple spin test: try spinning the rotor manually (only when the engine is not connected). If with effort, but still gone - no problem. In turn, a tight fit can be the result of clogging or unsuitable lubrication in bearings (or the use of improper).
Learn how to properly feed peacocks, goslings, broilers, pigs, quails, chickens, laying hens, hawks, rabbits, calves.
After ensuring that the motor is in good condition, put the casing in place and try to turn it on. Listen - the hum should be even, without cutting the "wedges". Their presence indicates a play of the bearings or a broken clip.
With the engine sorted out. In addition to the "heart", you will need the following components:
- iron corner (25 and 35 mm);
- shaft under the screw;
- steel wire (diameter 10 mm);
- rods (8 mm);
- pipe (for the body);
- preparation under fiera;
- threaded transition;
- coupling with lock nut on the way out;
- bush with two bearings (63x18 in diameter);

Important! Prepared bearings should be wiped before installation. To do this, fit a rag dipped in kerosene or gasoline.
- two pulleys (gear ratio);
- galvanized iron under the bunker;
- capacitors (4 working at 8 mKf and 2 starting at 280 mKf);
- plug and switch.
Manufacturing process
The action algorithm at the beginning of the assembly will be as follows:
- The first is preparing the frame. Corners are cut to size, set and boil. In our case, the base of the “bed” has dimensions of 40x80 cm. The upper platform under the case is 16x40.
- Then put the legs on the frame (40 cm). Welded them to the base, moving to the connection with the "tip". Centimeters in 5 under it put paired jumpers.
- To mount the engine will have to cook another frame from the same corner. In its racks oblong cuts are made, due to which the belt tension will be adjusted. It is finally fixed only after both shafts are exposed.
You can make the frame yourself, and then begin more complex work (including turning). Difficulties relate mainly to manufacturing auger:
- At one of the edges of the shaft (42 cm long and 27 mm in diameter), a 2-centimeter taper with angles of 45 ° is turned on a lathe. He plays the role of the tip.
Did you know? In 1963 a moose farm was laid near Kostroma! There were few animals, they periodically ran away, and then local people were involved in the search. Surprisingly, the experimental farm works today.
- At the base of the shaft, tightly clamped in a yew, wind the wire "ten". This will be the screws. It will have to expose at the right angle, weld and gently trim the ridges "grinder". Without an assistant it is almost unreal.
- The first comes from the raw roller machine. From the first to the second screw should be about 25 mm (if measured in the center of the ridge) - this is where the raw materials fall. The gap between the second and third will be the same.
- Five central turns are placed with an interval of 20 mm;
- At 2-2.5 cm from them, two pieces of wire are tightly “riveting” at once - the blank of the warming washer. Having trimmed its surface, the "grinder" makes slightly oblique shallow cuts (around the entire circumference, in 1 cm increments).
- From the edge of the washer, a portable auger will protrude, followed by three more with a gap of 20 mm. This kind of work can take a whole day.
WITH top hat also have to tinker.
Expose the bars just so, "by eye" will not work. To avoid skewing, look for the pipe - "forty" (it has an outer diameter of 48 mm). Both ends are clamps that will clamp the bars. But there is one more nuance. Even before “welding”, a few bars will have to be cut so that a loading window is obtained (3x2 cm), which will be 3 cm from one of the edges.
Important! A flat surface is selected as the working platform. Tilt in any direction is contraindicated - in this case, the machine will either overheat or “grind” idle.The shaft must go out of the cylinder with a margin - it should be enough to install the pulley. Everything is exposed and fitted - you can cook. Be prepared for the fact that the workpiece will heat up and drain, and it will not be easy to knock it out of the pipe. To make the task easier, take the pipe longer, and if necessary, put a nickle on the body wall, which you will have to beat heavily with a sledgehammer.
When the cylinder cools down, it is cleaned of rust. Then insert the finished auger. Between the walls and the screws should remain no more than 1 mm. The tapered edge of the shaft will extend completely. It is there that will be welded on suitable thread diameter (here - "50") with a length of 2 cm.

Separate topic - manufacturing fuiers. This is a difficult turning job. The fact is that with one end it should be put on the tapered edge of the shaft (you will have to make a similar notch in the center). Do not forget about the external thread, with which the whole part will be screwed onto the cylinder. But its parameters:
- length - 80 mm;
- the diameter of the "joint" - 49 mm;
- inner hole - 15 mm.
Did you know? Older people probably remember the ban on keeping cattle in the suburbs, which was in force in the early 1960s. Some owners at the time went to the trick, sending their breadwinners underground (in the truest sense of the word).Do not forget about bearingsthat will have to fill the shaft. Crimping requires accuracy and installation of support sleeves. Keep in mind that they somewhat complicate the maintenance of the bearing, therefore, the clips must be "fresh".

For a small farm will be enough ordinary filling. bunker from galvanized iron. It is based on a riveted square (16x16 cm). Counting from its top 14 cm, make a uniform bend at the bottom of the front wall. Then the rear wall is fitted and a hole is made, which should go into the window on the case.
With the upper frame connect it with "legs" from a corner of 25 mm, welded at an angle. To them the bunker is riveted on both sides, pre-drilled holes.
For the extrusion of feed using wheat, barley, peas, corn, millet, lupins, beans.
The final installation is associated with electrical equipment.:
- All working compensators are placed in one unit and soldered sequentially. With the start-up the same story.
- Then both wires from the first work out.
- On the middle and lower bolts of the motor “block”, free ends from the plug should already be secured. One of the free wires from the capacitor clings to the upper bolt, and the second is displayed on the starting "condo".
- At the first working "condo" solder the wire from the trigger switch (the second is already connected to them).

Important! All capacitors need to "pack" in wooden boxes. Of course, after work they are covered to prevent moisture from entering there.
The final chord is the installation and “hanging out” of the pulleys, which must stand vertically and without any distortions relative to each other. If everything came together, you can test and start work. The first "runs" are made on soft raw materials like cake.
Make or buy?
We gave an example of how to assemble an extruder at home, and this “manual” will be enough to understand what it is and whether it is worth undertaking to make it yourself.
In favor of such a solution, the following arguments are given:
- low cost;
- the ability to "fit" the unit to fit your needs by choosing the appropriate size;
- easy maintenance;
- simple electrical circuit without many pads and plugs;
- savings on the purchase of feed (in the course are home stocks);
- good productivity.
- the complexity of the assembly, which requires tools and skills;
- accelerated heating of the cylinder, which affects almost all "homemade";
- unprotected wiring.

Let everyone make their own conclusions, based on their own considerations. We can only ascertain that the extruder will be a great help to a small compound with a “handy” owner. But a farmer with a large scale will need a stable (and expensive) factory product.
Now you know what the extruder is useful for and how its production is connected. We hope you will correctly calculate the design, collecting a durable machine. Successes in household!