Many experienced beekeepers who own a large number of hives, have long been actively using a variety of transport equipment to facilitate their work and greater efficiency in the beekeeping business. Including they use a special lift (apiary carriage) or, in a different way, apilift.
Such a design can be purchased in a specialized store for a lot of money, or make your own hands, based on the detailed instructions presented in this material.
Principle of operation
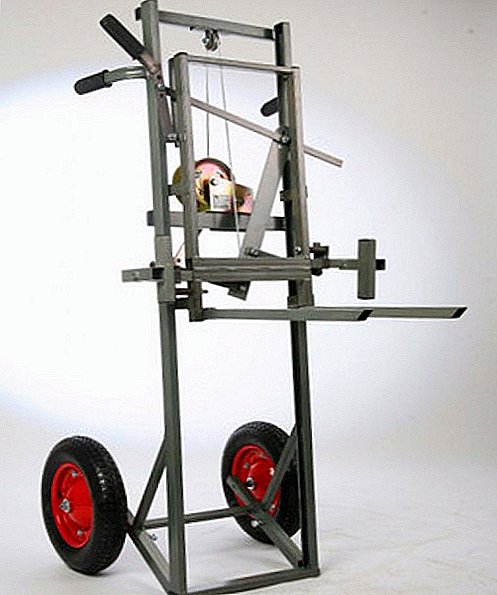
The operation principle of the apilift is quite simple: with the help of side clamps, the design fixes the hive body, a lever is used for lifting, and then the selected hive can be transported to any point.
Important! When purchasing ready apilift in the trade network, a number of such necessary characteristics should be taken into account: the grip of the trolley should have a working range between 34.8 and 53.6 cm, the weight of the load should not exceed one and a half centners, the hive should rise no more than 130 cm.
Apilift do it yourself
Having decided to build an apiary trolley for transporting beehives on your own with your own hands, please be as patient as possible, because the selection of the main components will take some time, and the installation will have to be carried out exactly as instructed so that the apilift will function properly in the future. 
We advise you to learn how to build yourself: beehive, Dadan's beehive, Alpine beehive, Warre's beehive, multilevel beehive, and also read how to build a pavilion for bees.
Materials and tools
For the proper manufacture of your lift you must first prepare the following materials:
- two wheels on the axle;
- two frames (including one fixed);
- cable;
- lever arm;
- clamping bracket;
- forks.
- welding machine;
- bearing rollers;
- tension springs;
- the coil on which the cable will be coiled;
- yardstick;
- profile pipes (with sizes of squares 4x2, 3x2, 2.5x2.5);
- bolts (M6, M8) and nuts;
- rubberized handles.
Did you know? The very first hives were made in the form of cylinders of bark; on the one hand, the "house" was tightly closed, on the other - a cork with a hole was inserted. The inhabitants of Africa to this day treat these hives with special liquids in order to lure wild bees into previously made homes.
Step by step process with photos
If all the necessary materials and tools for collecting carts are already prepared, you can proceed to the manufacturing process itself, which, for greater efficiency, will be shown in stages and with a photo.
1st stage. Assembling the frame with the coil.
- First, it is necessary to weld square pipes so that the overall size of the structure, in the finished state, is 157x370 cm, then 4 perpendicular beams are welded to it (this is done end-to-end).
- Attach the lower beam to the sidewalls flat, and for the two middle ones the smallest available pipe (3x2) is useful.
- It is not allowed that the resulting gap between the top beam and the second crossbar is less than half a meter.
- Between the third beam and the bottom bar make a gap of 38 cm in length.
- Next, make a 2-centimeter cut from the outside of the frame racks - specifically to move the bearing.
- On each side of the third (top) beam, one hole is drilled, specially for the prepared M8 bolts, in order to fix the wheel brackets at these places.
- Rubberized handles are welded to the side pipes, with a 20-centimeter indent from the top beam.
Important! If the edges of the cut did not fix the M6 bolts, the bearing may fly out of the groove during operation.


2nd stage. Assembling the main mechanism of the lift, wheels and coils.
- The 4-centimeter (diameter) bearing with a retainer is functionally designed to prevent the situation when the cable may fall out of the block lifting the load - it is fixed on the transverse top beam, always from the front. In addition, a 13 centimeter indent is made from the right edge.
- A roller groove is used to insert a steel cable (3 mm); it is fixed on the left side (with bolts, indent also 13 cm) with the upper end.
- Place the coil on the second (top) crossbar (mandatory 12-centimeter indent from the upper frame rib), and the coil axis is fixed in the bearing.
- Further, on the other side of the beam, a 20-cm lever should be welded, the handle of which rotates freely around its axis.
- To the crossbar with the lever and the coil already attached by welding, metal stoppers are also welded in the upper and lower parts.
- The cable to the metal lever and the spring attached lever handle.
- Wheels matched to the future apilift have special wheel axles and an obligatory diameter of 38 cm - they are mounted on brackets made of a profile tube. From the outside, the axles are fixed with nuts.
- On the frame are fixed rectangular plates of steel.
- When looking at the bracket, you should see two pipes (30 and 23 cm in size), perpendicularly welded, connected to the frame with M8 bolts. Thus, the design easily, at different angles, leans towards the earth's surface, since the extension of the attached wheels from the brackets is carried out without any problems.


3rd stage. Carriages, forks and clips.
- The carriage is a complicated element of the lift, so its installation is performed from numerous parts. Including, there is a clamp, an exciting hive. A cable block should be welded to the center of the lower cross member.
- The movement of the carriage will be at the expense of bearings, with the help of a frame, as well as a fork.
- The plug should be attached to the main structure.

 To carry out the step-by-step instructions for assembling the apiary lift in the best way will help a special drawing.
Did you know? The first trolley in the world was created in ancient Greece around 408 BC. e.
Features of operation
Operating this equipment, it is desirable to follow the rules prescribed in the instructions, as well as pay attention to some features of the beekeeping carriage:
- before starting work with the lift, you need to gain confidence in its 100% technical serviceability, using it initially, without loading;
- fixing screws and nuts should be as dense as possible, this applies to a greater extent to those areas where the cable rollers are fixed;
- unconditionally clean carriages must be completely freed from all outsider;
- it will not be superfluous to double-check whether the support-ram bolts were tight enough to be fixed through washers;
- during operation, the forks should check whether the fasteners are fully inserted into the slots
- It is imperative to ensure that the upper stops do not become stops for carriage rollers.
Learn about the various properties and applications of such beekeeping products as: wax, pollen, propolis, zabrus, perga, royal jelly and of course - honey (rapeseed, acacia, may, sweet clover, linden, buckwheat, chestnut and others), which is rightly considered the most valuable product of beekeeping.
As you can see, it’s quite realistic to make a convenient lift of hives with your own hands, and despite the rather laborious process, the result will surely meet your expectations.