The technology to create a roof covering with two sloping outer walls is one of the most popular in the world. It makes it possible to protect the structure to the maximum from all kinds of precipitation, as well as to create a sufficiently large attic room. However, despite the simplicity of the construction of such a roof, for many builders, amateur construction of this structure becomes a difficult task. Both at the design stage and during installation, most make quite serious mistakes, which directly affects the durability and waterproofing functions of the roof. Let's take a closer look at what we need to begin the construction of this roofing structure, as well as learn the main secrets of its installation.
Measurement
Making measurements is the first and one of the main stages of creating a gable (gable) roof, so it should be approached no less seriously than the installation itself. Correct and careful measurements are called the main conditions for the development of a quality project with minimal flaws, in addition, at this stage, primary calculations are made of the necessary material and its quantity.
Read tips on garden planning and front garden decoration.
Measurements are performed in several stages. First, it is necessary to determine the overall dimensions of the space to be covered by the roof and its shape. To do this, measure the length of each of the walls on the outside. After that, measure the thickness of each of the walls, as well as determine the presence of a central support. This is necessary in order to determine the type of truss system at the design stage, and also to determine whether the supporting structures are capable of supporting the weight of the entire roof structure. The collected data must be checked several times, because only in this case it will be possible to protect against possible errors in the development of the project.
Important! Measuring the roof on the basis of the previously created project of the building is not worth it, as in the process of building walls there could be serious deviations.
Project development
After careful measurements, you can proceed to the next, no less important step - the creation of the project of the future roof. All upcoming mathematical calculations must be approached with special care, since errors can lead to an irregular shape of the structure, to its deformation and even destruction during operation.
At this stage, you need to decide on such important characteristics as:
- type and step rafters;
- angle of inclination of the structure;
- roof height;
- the form.
Rafter systems are of two types: hanging and hanging.  Hanging rafters they rely only on two extreme points, which are often external walls. This type is chosen in the case of a small building in which there are no central load-bearing walls. Rafter rafters construct only in the case when it is possible to create additional support between the main load-bearing walls. Such a system is a more profitable option, since it often requires less materials, and the total weight of the roof while its load on the foundation decreases significantly.
The optimal step of rafters (from 600 to 1800 mm) depends on the type of roofing material and the cross section of rafter legs, which can vary depending on the purpose and size of the building: from 40x150mm (light outbuildings) to 100x250 mm (houses with large squares). It is possible to calculate the most optimal relationship between these indicators with the help of special construction tables approved by the state architectural inspectorates.  The angle and height of the roof depend on many factors, but the climatic features of the region and the need for an additional attic should be taken into account. If the structure is being erected in regions with strong winds, the angle should be reduced to 30 °; in conditions of heavy precipitation and severe snowy winters it is maximally increased to 60 ° in order to reduce the overall pressure on the structure.
  The optimal form depends on additional mansard space needs. To this end, it is possible to design a roof in the form of a regular triangle with a small attic room, as well as a sloping dvuhskatnuyu design with an increased attic for the arrangement of an additional room. Affects the angle and type of roofing material.
Learn more about mansard roof construction.
During the design of the future structure, it is necessary to determine the type of material that will be used in the future, as well as its possible load on the foundation and load-bearing walls. To do this, you need to calculate the weight and quantity of all wooden elements, roofing material, insulation and other things. 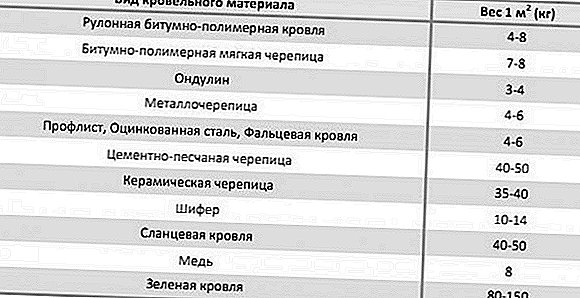 For these purposes, it is necessary to use special construction tables, since only with their help it is possible to determine the most beneficial relationship between the type and amount of material for the roof arrangement, the thickness of the supporting elements and the reliability of the future structure. However, these calculations should be approached only after determining the pitch, section of the rafters and other features.
Video: the basics of building truss system
Important! If you do not have the necessary technical skills for the independent design of the roof, contact the specialized design organizations, since only in this case you can be confident in the safety of the future structure.
Preparation of materials and tools
The construction of a gable roof begins with the preparation of the necessary materials and tools. This is necessary in order to speed up the erection of structures, as well as to comply with all security measures during installation. To do this, everything you need to be carefully inspected for full health and functionality.
For this type of work you will need the following tools:
- hammer;
- wooden or rubber mallet;
- nail puller;
- several building levels of different lengths;
- plummet;
- wooden or plastic rail about 1.5 m long;
- roulette not less than 5 meters;
- power tools - drill, screwdriver, jigsaw, planer, saw and associated consumables;
- hacksaw;
- chisel;
- at least 2 sliding stepladders of sufficient length;
- furniture stapler.
 Necessary materials:
- metal corners for fixing rafters;
- construction brackets;
- wood screws, nails and anchors for fastening parts together;
- beams for laying Mauerlat;
- rafter beams;
- bars to create the outer crates.
Special attention should be paid to wooden materials, as they are the basis of the future structure. For construction needs use specially prepared and dried wood. Best of all, if conifers are used for these purposes - they have high strength, but at the same time, the necessary ease and simplicity in processing. If the materials you have purchased do not have sufficiently ideal forms, they must be brought to the desired state with the help of a planer and other tools, which will help facilitate their subsequent installation.
Important! Wood with a moisture content not exceeding 18% is suitable for installation, since over time it may deform and disrupt the structure. To protect yourself, the purchased material must be pre-dried naturally for several weeks.
To give the wood the desired durability and fire safety, it is necessary must be treated with special chemical solutions. These include antiseptics, as well as fluids that provide wood moisture resistance and low flammability. Today there are a lot of manufacturers and names of such products on the market, however, we recommend to turn our attention exclusively to the means of comprehensive protection. They give the opportunity to give the wood the desired characteristics with a minimum number of technological cycles.
Read also about the creation on the site of the tracks (from concrete, wood cuts) and fences (from the netting chain-link, shtaketnika, gabions, weaving).
Mount mount
Regardless of the type of roof system, roof mounting should be recited from fixing the power plate - the upper mounting belt, to which the rafters are directly mounted. In the structures of the log house, its role is played by the upper logs located along the contour of the structure, while in brick buildings it is a specially constructed structure. Its role is played by a thick square timber with dimensions ranging from 50x150 mm to 150x150 mm, which is mounted along the top of the wall along the entire perimeter of the building. Its main task is to evenly distribute the load of the roof on the bearing walls and the foundation.  The installation of the mauerlat begins with the preliminary installation of metal studs with a thread with a diameter of at least 12 mm in the upper part of the walls. The pitch between the studs should be about 100-150 mm. With the help of them, the timber will be attached to the supporting structures, and care should be taken to ensure that after mounting the mounting plate the height of the fastener does not exceed 20-30 mm.
Further in the beams it is necessary to drill the holes with a drill, and then tightly fasten them with pins using a nut. Between the mauerlat and the wall it is necessary to lay a waterproofing layer of roofing material, hydro-barrier, etc. In brick buildings, the role of a mauerlat can be played by a monolithic concrete beam with built-in steel studs, however this design is much more difficult to install.
Did you know? Such a roofing material, like corrugated board, was first born in 1820. He invented Henry Palmer - famous British architect and engineer.
Mounting frame (truss system, leg)
After attaching the power plate, you can begin to install the truss system. The process starts with laying downwhich are a wooden bar with a section of 150x150mm. It is mounted on the ceiling ceiling in 1 m increments, but often this distance can be leveled depending on the conditions. Subsequently, the logs become the basis for the supporting pillars of the roof. After that, you can proceed to the installation of a truss. It is a composite construction of various elements in the form of a triangle and is often made of a bar (truss foot) of 50x150 cm in size.  A truss truss is constructed from individual triangles of the same shape. In most cases, they are started on earth. For this purpose, a template is made from separate truss legs, according to which other parts of the truss truss are constructed. After that, each of the elements alternately rises and is mounted to the power plate at an equal distance from each other. To give durability and reliability of the truss on the rafter legs and the mauerlate, special sawnings are carried out, which give the whole structure the maximum possible rigidity.
  Installation of the frame in two ways. When the first elements of the truss trusses are fixed in turn, from one side to the other. In the second, the extreme parts of the truss system are attached to the power plate, after which the rest are uniformly mounted between them. All wooden materials are fixed together with metal corners.
Important! In case of shortage of the length of the wooden beam when installing the roof frame, it can be increased. To do this, use the method of splicing or spike method of elongation of the beams.
Video: installation of rafters
Installing the ridge beam
To make the future roof reliable, it needs to be strengthened with a ridge beam. This is a special wooden beam that is attached to the inside of the roof at the point where the rafter legs are attached.  Its installation can be done in two ways. In the first case, the timber is fixed after the installation of the main elements of the truss system.
In the second - it becomes the basis for the entire frame. To do this, the extreme elements of the truss truss are mounted, after which they are connected to each other with a ridge bar, then the central elements of the truss truss are mounted.  To improve the rigidity of the structure, at the junction of the rafter legs do special ridges in the form of a ridge bar. In addition, the fastening of wooden parts to each other with the help of metal corners is enhanced.
  Subsequently, the ridge beam becomes the basis for the attachment of the supporting pillars.
Possible installation of bolt
If it is not possible to fasten the central support legs to reduce the effect of the thrust force on the mauerlat, it is necessary to install special construction screeds, called bolts. Their role is played by a wooden bar with a cross section of 50x150 mm, however, these dimensions may vary depending on the conditions and type of the building.  Mount the bolt between the truss legs from the side of the roof at a distance of 1 meter from the ridge parallel to the base of the whole structure. Nails or screws should be used as fasteners; to improve the rigidity of the whole structure, the beam can be further strengthened with metal corners.
A bed of stones, a dry stream, a rock arion, an alpine slide, a garden swing, a fountain, a waterfall, garden crafts (a ladybug, a decorative stump, a palm tree made of plastic bottles) will help to make the dacha area cozy and unusual.
Strengthening the roof
To give a gable roof durability, reliability and durability, it is further strengthened. For these purposes, use central pillars, struts, bracing, tightening, diagonal ovaries. A bar of any section is used for their manufacture, but beams of 50x150 mm are best suited for this purpose.  The central pillar is mounted on one side in the zone of the ridge bar, and on the other side - to the floor, perpendicular to the base of the building near each pair of truss legs. They fix it with screws or nails and additionally reinforce with metal corners. The main task of the central pillar is to reduce the total load on the roof and redistribute it to the power plate, and then to the foundation and walls. This is especially important when arranging buildings more than 8 meters wide.
Important! The emphasis of the central pillar must fall on the supporting wall, otherwise, during operation, the structure may collapse.
Bracing is an essential element of long roofs, their task is to reduce the load of the whole structure on the gable beams. For installation of braces use a bar of the greatest possible section, however for these purposes also the remains of rafter legs will approach. The bracing is attached as follows: one side of the beam must rest on the corner of the pediment, the other to the central beam.  The struts, puffs and diagonal ovaries serve as an additional strengthening of the roof, which is especially important in regions with long periods of snowfall. Tightening fasten each pair of truss feet at the base. They enable them not to disperse during operation.
  The struts give extra rigidity to the roof. Attach them to each pair of truss legs on both sides. One side of the strut should fit snugly to the base of the central beam, and the other to the center of the rafter or closer to the ridge. Diagonal ovaries are mounted as follows: the lower side of the beam must be attached to the bottom of one rafter, and the second to the middle of the next.
Video: Strengthening rafters puffs and braces
Crate
After arranging a reliable foundation of the roof, you can proceed to the crate structure. It plays the role of an additional frame to which the roofing material will be attached.  The crate consists of a counter and a crate beam. The counter beam is fastened along the contour of the rafters, after which the sheathing is fixed on top of it. For lathing, a timber with a cross section of 50x60 mm is best suited, and its pitch depends on the type of roofing material. For example, for metal tile it should be about 350 mm, for sheeting and slate - about 450 mm.
  In the case of a soft roof, the crate should be double. The first layer is made of boards with a diameter of not more than 25 mm and a width of about 140 mm, with a gap between them of about 10 mm. The second layer should be as solid as possible and without any gaps; therefore, for this purpose, moisture-proof wooden slabs with a diameter of at least 10 mm are used.
To remove moisture from under the roofing material in the crates equip vent holes. To do this, on each side it is necessary to provide 2-3 air channels with a width of about 5 cm. They must begin from the bottom of the overhang and end as high as possible.
Read also about how to build a veranda, pergola, gazebo (polycarbonate), barbecue (stone), bench in the cottage.
Laying vapor barrier membrane, insulation, waterproofing
To protect the material of the batten from condensate, you need to take care of special waterproofing film or membrane. Each of these materials has its advantages and disadvantages. Membranes are the best choice for residential premises. В отличие от простых пленок, они обладают высокой долговечностью, стойкостью к ультрафиолетовому излучению, а также способны пропускать пар из помещения наружу, однако их цена довольно высока.
Waterproofing film is a cheaper material than a membrane, but less durable. Often it is placed in non-residential premises (shed, garage, etc.). Laying moisture-proof materials is made in front of the lathing and counter-bar, directly to the rafters. To do this, use small studs or furniture stapler.  For arrangement in the attic of the living room roof is additionally warmed. For this purpose, they use only mineral wool, since any kind of foam plastic for internal thermal insulation works is strictly prohibited. Lay the insulation from the inside of the attic, in the opening between the rafters. According to the need for thermal insulation materials, a special frame is designed. The thickness of the insulation layer, depending on the climatic characteristics of the region, may vary. For example, in a temperate climate it should be at least 100-150 mm.
  On top of the mineral wool should lay a ball of vapor barrier membrane. This will give the opportunity to protect the insulation from the accumulation of condensate in it. Next, on top of the insulation should be constructed crate of wooden bars or aluminum profiles, and then close it with drywall or wooden building boards.
Did you know? The history of slate began in 1901, thanks to Ludwig Gatchchek. This year, an Austrian scientist for the first time patented a method of making roofing slabs from asbestos cement.
Installation of drippers
The next step in the arrangement of the dual-slope roof is the installation of drips. They are necessary in order to protect the eaves and ridge from moisture during rain or snow melting. Kapelnik is a system of metal plates and flexible plates.  The plates are fastened to the roof crate with nails, in the area of the ridge and cornice with an overlap of at least 50 mm. After that, a flexible plate is attached to the plates, which improves not only the functional capabilities of the drip, but also affects aesthetics. If necessary, the drip can be discharged into the gutter; however, it should be mounted only after the roof covering.
Video: setting drip
Coating installation
The final stage of the installation of a gable roof is covering the frame with roofing materials. On the current market there are many varieties of this coating: slate, shingles, corrugated And so on. The most budget option is the usual wavy slateTested for generations and decades, but its main disadvantage is quite a lot of weight.  Ondulin Representatives of the middle price category can be called metal roof or ondulin. Shingles is the most expensive type of coating. In addition to the additional costly lining instead of crates, it requires the creation of a monolithic layer of wooden plates.
Learn how to self-roof with ondulin.
The choice of the optimal type of coverage depends not only on the size of the budget. First of all, you should pay attention to the overall slope of the roof. With an angle of 20 ° or less, flat roofs of shingles are the best option. A small angle of the roof contributes to the delay of thawed and rainwater on its surface, therefore, only monolithic roofing material with hermetic seams can provide reliable protection of floors from atmospheric moisture.  Metal tile At an angle of construction more than 20 °, slate, metal tile, corrugated flooring or ondulin are used to choose from. Such materials often do not have thoroughly sealed joints, but a sufficiently high angle of the roof contributes to the most rapid outflow of moisture from its surface.
Did you know? Shingles came into being thanks to the American Henry Reynolds. In 1903, he first proposed cutting roofed roofing felt into separate small pieces of a rectangular or hexagonal shape to facilitate its installation.
Skate mount
After installation of the roofing material install skate. This accessory is necessary in order to protect the upper seam between the two slopes of the roof from precipitation.  The ridge is a metal or plastic corner with a length of 2 meters and a width of each side of 150-200 mm. Attach it to crate beams with an overlap of 100-200 mm. To do this, use special screws with a big hat or roofing nails, the distance between fasteners should be about 100-150 mm.
Video: DIY gable roof
The double-pitch roof is a rather complicated structure in the design and installation, the arrangement of which requires a lot of technical knowledge and skills. Therefore, before embarking on construction work, it is necessary to take into account all sorts of nuances of its installation during the development of the project. Only in this case will the dual slope roof become a real protection from rain and snow, and will also serve faithfully for more than a decade.