Four roof slopes in different planes give the building a respectable appearance, but at the same time, the construction of such a structure is the most difficult stage in the construction of the building. In order for the roof to turn out to be correct and to serve for many years, it is necessary to correctly calculate all the constituent elements and not to deviate from the obtained values throughout the entire construction period.
Measurement
To make the roof “correct”, it is necessary to calculate the proportionality coefficient of the elements of its construction.
For these purposes, use the gauge rail (hereinafter referred to as the gauge tool), on which all sizes are applied for convenience, this allows to reduce the number of measurements and the time for carrying them out. The rail is made of plywood, 5 cm wide.  Using the gauge rail There are also tables that indicate the ratio of the number of rafters to their length. The correspondence is calculated in percent between the length of the hips and the slopes, then the strength characteristic of the roof is determined from them:
- the axis of the building is marked on the top of the harness;
- determines the location of the first part of the rafter system, for this it is necessary to calculate the thickness of the ridge;
- determined by the location of the intermediate rafterFor this, the end of the measuring tool is applied to the marked line, and the other end is left on the line of the wall;
- determined by the length of the overhang - one end of the beam is placed to the corner of the outer wall, the other - to the overhang of the roof. To calculate the other component of the central rafter you need to shift the rail to the edge of the side wall, the marks on the tool will indicate the location of the beam. These operations are carried out at all angles;
- All these actions allow you to determine the place where the ends of the ridge and intermediate rafter will be located.. The gauge rail measures the projection of the intermediate beam in the horizon. Further according to the table, the appropriate slope of the roof is determined;
- the length of the beam from the notch on the base to the ridge is measured at the place of the planned fastener.
The most common is the gable roof, which, of course, consists of two slopes.
Calculation and measurement of angles:
- measured beam - from the corner of the wall. It is multiplied twice and the desired projection distance is obtained;
- the required length of the angular rafter is calculated from the previously measured beam using the correction factor.
Video: features of the frame assembly hip roof
Project development
To begin work on the construction of the roof it is necessary to design, carry out calculations on the design and make a drawing on a reduced scale. When performing a project of such a roof, you need to take into account all the loads that will act on it.
Initially determine the angles under which the roof slopes will be inclined. It can be from 5 to 60 ° and this is determined on the basis of:
- loft assignments;
- wind strength, snow and rain;
- from what the roof will be made.
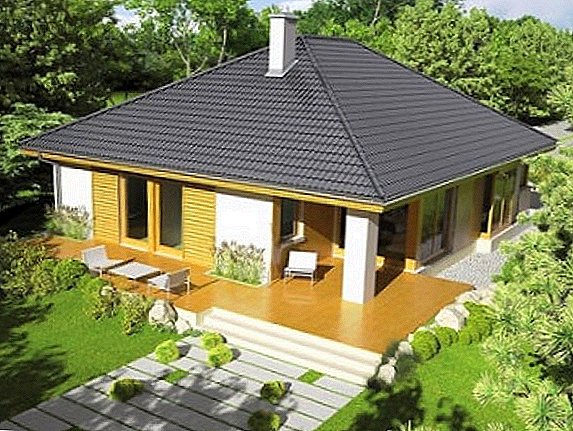
 Drawing and layout of the four-slope roof For construction in an area with very snowy winters, the slope angle should be at least 45 °.
Calculation rules for design:
- the drawing of the roof surface should be divided into simple geometric shapes and all dimensions should be applied - it will be easier to perform the calculation;
- calculate each ramp by multiplying its area by the cosine of the angle of inclination;
- the height of the ridge of the roof is calculated by the formula of a right triangle;
- the cross section of the rafters depends on the load on them and the angle of inclination of the roof. Calculate the distance (pitch) between them, bearing capacity, strength and degree of deformation;
- the total weight of the roof is calculated based on the amount of material and the area of the building;
- if additional loads are suspended to the beams, then the payload index is introduced in the calculation.
Important! Proper design of building structures - a responsible procedure, and most importantly at this stage - correct calculations. Therefore, experts recommend to recheck them more than once.
Preparation of materials and tools
The best timber for the construction of the roof will be conifers. The wood should be of high quality, free of defects, and the humidity should not exceed 22%.
For the construction of the desired construction such materials are necessary:
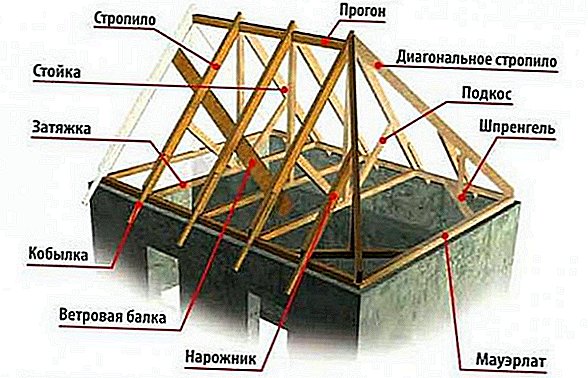
- mauerlat - the support bar experiencing the greatest pressure should be integral, with a cross section of at least 150x150 mm;
- racks and sprengeli - vertical supports;
- puffs - connect the side beams, do not allow them to disperse;
- rafters side, diagonal and nakosny - boards of 50x100 mm, for a large area better than 50x200 mm;
- women resident - parts for the frame of the slope, fall on the diagonal rafter;
- wind beams and struts - for structural strength;
- lie down - bars, laid on the supporting internal walls;
- ridge beam - the top of the roof, is a support for the rafters;
- mares - boards fastened at the bottom of the rafters create weight for the roof;
- boards for crates.
 Construction of hip (hip roof) Fastening material: studs for fastening the frame to the walls, metal plates for connecting various parts.
We also advise you to read: how to remove paint from the walls, and whitewash from the ceiling, how to glue wallpaper, how to run water in a private house, how to put the socket and the switch, how to make a plasterboard partition with a doorway or how to sheathe the walls with gypsum cardboard.
Timber is treated with antiseptics that protect the wood from various fungi and mold. These compounds should have a long term protection, not to wash out and penetrate deep into the material being processed.
Tool:
- construction level;
- handsaw and circular saw;
- tape measure and plummet;
- drill, screwdriver;
- chisel and hammer.
Mounting plate and top cover
In wooden houses, the last row of the log is used as a mauerlat. For fixing rafters in logs cut down the grooves. In the brick buildings, the made lower frame of the bars lies along the perimeter of the external walls on the concrete reinforcement cage. In the belt laid metal studs for fastening the beam.
For accurate marking, each timber rests on the studs and on top of it hit with a hammer, thus, an accurate mark of fasteners. Then it is removed and drilled holes.
The prepared individual elements of the mauerlat are laid on walls covered with several layers of waterproofing - roofing felt. The beams are fastened with nuts, wound on the studs. The corners of the bars are fastened with metal plates or staples.
Video: Mounting the hipped roof After the fastener, the timber should not move even a millimeter - the reliability of the entire roof in the future depends on this. The peculiarity of laying Mauerlat - bars along the length stacked overlap with a large number of connections. Lezhie in the same way as the mowerlat fasten with a waterproofing only to the bearing internal walls.
Did you know? The best material for mauerlat is larch, because over time its wood becomes stronger.
Laying down
Legs play an important role in the roof system. Support racks and struts are attached to them. They are laid on the internal bearing partitions. If they are not in the structure, then the racks need the device of reinforced beams.
Given the high load, the beam is made of 100x200 mm timber. The bed laid on the wall can be a section of 100x100 mm. Align the horizon using wooden pads. If the braces are not provided, you can not install the beds, the racks at the bottom will be joined by fights. 
Rack Installation
The supports are fixed to the hollow or floor beams. Exposed along a plumb line and temporarily attached with trusses from bars using self-tapping screws. In the future, the racks are fixed with metal elements. The top connects to the ridge bar.  Installation of supports depends on the type of hipped roof:
- for hip construction supports are placed in 2 m increments in the center of the building (under the future ridge);
 Hinged roof rafter system
 - with tent design, racks are installed at equal distances from the corners on the diagonal.
 Hinged roof rafter system
 Rafter roof system
Installation of ridge beam
For a hip roof, the ridge beam is a bearing component of the whole structure, since diagonal rafters and the entire roof will be attached to it.
Video: montage of the ridge roof ridge roof A support beam is put on supports with the obligatory use of a plumb and a spirit level, which will allow to control the installation in two planes.
Important! The symmetry of the roof depends on the correct marking of the ridge bar, racks for it and diagonal rafters, and hence the uniform distribution of loads, which in turn will exclude the deformation of the structure.
The construction of the entire system depends on the correct installation of the ridge beam.  The layout of the ridge beam in the truss system of the hip roof
Trapezoidal stingrays
Trapezoidal slopes are formed by central and side rafters. The central rafter - boards that form the edges of the slope and adjacent to the ridge girder. Side rafters fill the ramp plane.
Pasture side rafters
The side rafters are set up according to the type of a dual-slope roof - they make a template by applying a 15 cm wide board to the ridge bar.
The top ledge with which the board will be fixed on the ridge bar is planned. The template is applied to the beam and marks the bottom gash, to focus on the power plate.
Connect all the angles and screws. The rafter spacing depends on the length of the girder and ranges from 50 cm to 1.5 m. The bottom of the rafter can be fixed using a support bar that is packed at the attachment point to the power plate, which preserves the integrity of the rafter.
We recommend to read how to build a mansard roof and a roof for a bath.
Strengthened by struts and mount skates
The side beams are supported by struts, with the lower edge resting on the floor, and the upper edge under 45 ° in the rafter foot.
The rafters are fixed to the skate beam with plates, wooden overlays, with the help of a hem without bevels.
Triangular stingrays
Hip slopes are formed by mowing rafters, and so that the roof is perfectly symmetrical, they are installed in the calculated places on the mauerlate.
Pasture nakosny (diagonal) rafters
Slanted rafters - a timber that is installed diagonally, resting one end at the corner of the mauerlat, and at the top it connects to the skate beam. The load on these rafters is two times greater than in the side. Therefore, for their manufacture using glued timber of the desired length or dual boards.
Video: Assembling the truss system of the hip roof Diagonal rafters are long, so they should be fastened securely to the roof right away. Gash below to attach to the mauerlat performed at an angle of 45 ° to the board.
For the rafter one or several racks are put, but the joints of the spliced boards should be located 15 cm from the support. Under the diagonal rafter, you can install the strut, if the emphasis is a flat bed, then the angle of inclination should be 35 -45 ° to the horizon. Additional supports are installed based on:
- length up to 7.5 m - one strut;
- length up to 9 m - support in the lower part or trussed truss;
- length over 9 m - additional support.
Important! If the overlap is not very strong, you need to lay an additional beam for support racks.
The upper end is joined to the ridge bar at the intersection of two central intermediate rafters, so the undercut in this part is done with two bevels and the fixing is done using a tamper - a short board 5 cm thick. You can also fix it with a metal plate or clamps.
Installing a lawyer
Narozhniks - short rafters used for fastening diagonal beams. They are made of solid material.
To the long rafters lasters fix with the help of a cut-in or with the installation of support strips, on both sides of the rafter, 50x50 mm in size, and all this is reinforced with metal elements.  Naroshniki are mounted on a diagonal beam with an offset so that there are no joints at one point. The lower end of the short beam rests against the power plate. These elements are installed with a step of 0.6 m, starting from the extreme ordinary rafters.
Strengthening by sprengel and struts
The greatest load in the roof with four ramps falls on the bottom of the diagonal rafters, therefore, to remove some of the load from them, install the sprengels (vertical supports). They are put on reinforced bars, as stands for a ridge beam. Use bar section:
- for beams - 10x15cm:
- for supports - 10x10 cm;
- for struts - 5x10cm.
The struts are fixed under the beams, which at the bottom abut against the basement or floor beams, and at the top edge under 45 ° fasten to the rafter.
Crate
Its installation provides high-quality laying of roofing material. The crate is made of bars or planks, they are stuffed onto rafters parallel to the ridge of the roof with a step of 0.5 m. Plywood is used for soft roofing material. 
Laying vapor barrier membrane, insulation, waterproofing
Roof Pie Installation Procedure:
- vapor barrier membrane is attached to the rafters;
- the obreshetka is established;
- insulated with waterproofing;
- the counter-lattice is fixed.
Video: installation of vapor barrier, insulation and waterproofing (for example, sloping roof)
Installation of drippers
Kapelnik - angular metal plate for water drainage from the waterproofing layer. The strap is mounted on the edge of the overhang of the roof. Step by step installation:
- fix the gutter to drain water;
- attach drip sheets with screws to the overlap of the lath;
- glue rubber rubber tape;
- remove the waterproofing film on top of the plate so that the edge of the film passes into the drip sheet;
- fix the edge of the waterproofing to the rubber tape on the drip, and the film itself to the rafters.

Did you know? The largest roof was built in the Emirates. Its area is 230000 m2, which corresponds to an area of 50 football fields.
Coating installation
Roofing material can be any, and installation is carried out according to the recommendations of the manufacturer. For various materials there are minimum angles of the roof:
- slate and roof tiles - 22°;
- roll materials, the angle depends on the number of layers - for three layers up to 5 °, for two - 15 °;
- decking - 12°;
- metal tile - 14°;
- ondulin - 6°;
- shingles - 11°.

Read more about how to roof the roof with ondulin and metal tile.
Skate mount
The material of the ridge depends on the roof material and during installation you need to pay attention to:
- to the correct height of this element;
- ensuring good ventilation of the roofing pie and the attic.
Functions of the ridge - a decorative combination of sections of the joined docked opposite ramps on a bar. Details of the ridge are mounted on the ridge girder with screws.
Video: building a hip roof Building a four-sided roof is a complicated process, but if you study the selection of materials for construction well, carry out the correct calculation and get helpers, you can do all the work yourself. This will save on the roofing master, whose work is valued very highly.