Hilling is an important process that is essential for high yields as well as potato protection. It turns out that if you do it wrong, you can harm the plants.
An important role here is played by adaptations, of which there are now many. In the article we will analyze the most popular and effective ones.
Let's tell what their principle of work is, how and with what type of work you can use them, how to make them yourself. And also we will give some tips on how to make this process less time consuming.
General recommendations
Hilling is stressful for the root system of any culture. For, in order not to harm the plants, it is recommended:
- carry out the procedure in the early morning or late evening;
- the day before the earthing up, shed earth abundantly;
- to tear out or cut off (if the plot is large) weeds, they can be left between the beds to protect the planting from the sun and retain moisture;
- after completion, it is desirable to arrange abundant watering.
Details on why you need to spud potatoes and why the yield increases after it, read here, and from this article you will learn about various methods of hilling.
How to spud potatoes?
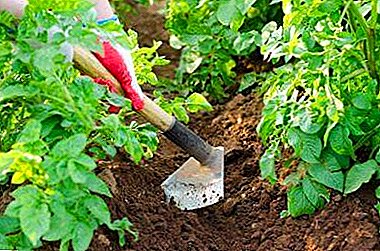
Hoe, chopper, shovel
 The most ancient and difficult way requiring physical training and some skill. The tool must have a wide work surface and a sharpened edge.
Hilling of potatoes is carried out from all sides according to the following instructions:
- We begin work in one direction, that is, we first go through all the rows on the one side, and then proceed to the reverse.
- At the end of each row we make a small mound so that the moisture remains in the aisle.
- The procedure is repeated about once every three weeks.
Manual mechanical disk hiller
Hiller consists of two metal discs, which are directed at an angle to each other, tapering from one side. To work you need two people. One will pull the mechanism, and the second will direct and press on it. A row is placed between the disks. Pressing them into the ground and moving the unit, you can spud a whole row in one pass. The process is very simple and saves time. The unit can be purchased at gardening stores, its cost is about three thousand rubles.
Plow
The tool consists of a frame or a rack to which a cutting knife, a wheel, and also a rod are attached.
Making a plow with your own hands is quite simple, it’s enough to have the following materials.:
- one inch metal pipe diameter for the manufacture of the rack;
- 1/3 or 2/3 inch pipe for traction;
- lanyard to change the plow angle;
- steel sheet with a thickness of at least 2 mm for the manufacture of dumps;
- wheel with fork, placed in front of the structure (the wheel from a medium-sized bicycle would be ideal).
To collect the construction will need:
- Bulgarian;
- blowtorch;
- welding machine;
- sledge hammer or special tool for bending pipes.
Independent manufacture of the plow:
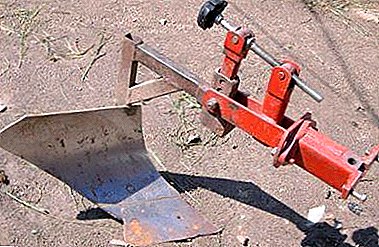 To make the two-tail plow itself, you need to give the steel plates semi-circular bends, and then weld them to the stand.
- The junction of the two parts and the rack must be flat, for this it is carefully polished grinder.
- Then the tip or undercutter is made, which is necessary for the plow to hit the ground. It grinds at a 45-degree angle to make it sharp, then welded to the bottom of the rack and ground.
 To make the two-tail plow itself, you need to give the steel plates semi-circular bends, and then weld them to the stand.
If you do not want to engage in the manufacture of the plow yourself, then it can be purchased at any farm store for about three thousand rubles. A well-made plow can last several decades.
The working process itself is as follows: the farmer pushes the structure, the plow cuts the ground, and thanks to the side blades, it distributes the loosened soil to the root part of the potato in two adjacent rows.
Cultivator
Motor-cultivator - rather inexpensive automatic solution for the gardener. Only suitable for loosening the soil with a cutter, weeding and hilling in the aisle. It makes sense to use only on small plots up to 0.5 Ha with light ground.
The principle of the cultivator is as follows:
- First, using the cutter, the soil is loosened.
- Then in the second pass, the cutter is changed to a plow and hilling is carried out.
Motoblock
Motoblock - rather expensive toolhaving its pros and cons. Its main advantage is its versatility: you can loosen the ground, spud, and harvest. An additional plus is the speed of processing and saving your time.
The disadvantages include its high cost and a higher percentage of damaged tubers than in the case of hand tools.
There are manual and industrial options. Industrial allow to process several rows of potatoes in one passthat saves gas and time.
Important! Use of the tiller must be provided at the landing stage. Potato rows should be flat with a fixed distance between rows and bushes in them. It is recommended to tighten the nylon thread over the rows and mark the field before planting the seedlings.
The principle of operation is simple: disk wheels or a milling cutter are installed forward, which loosen the ground, and a plow is placed at the rear, scooping the soil on the bushes.
Hilling is recommended in one direction, as well as It is important to choose the optimal depth of the knife, so as not to damage the roots.
In detail about the advantages and disadvantages of hilling potatoes with a walk-behind tractor, also in when it is necessary to carry out the procedure, read our material.
Other tool
 There are other tools for loosening the soil and hilling of potato bushes, the most famous of which are:
- ripper "Tornado";
- rotary pitchfork;
- shovel Prokopenko and others.
If you delve into the process, then you can find a few dozen solutions from craftsmen, but it is always better to use the already well-established methods of tucking.
Conclusion
We reviewed the basic tools for hilling, as well as the process of working with them. Of course, the choice of means is determined individually depending on the size and location of the site, the types of soil and the purpose of planting. We hope that our article will help in choosing the right solution.